
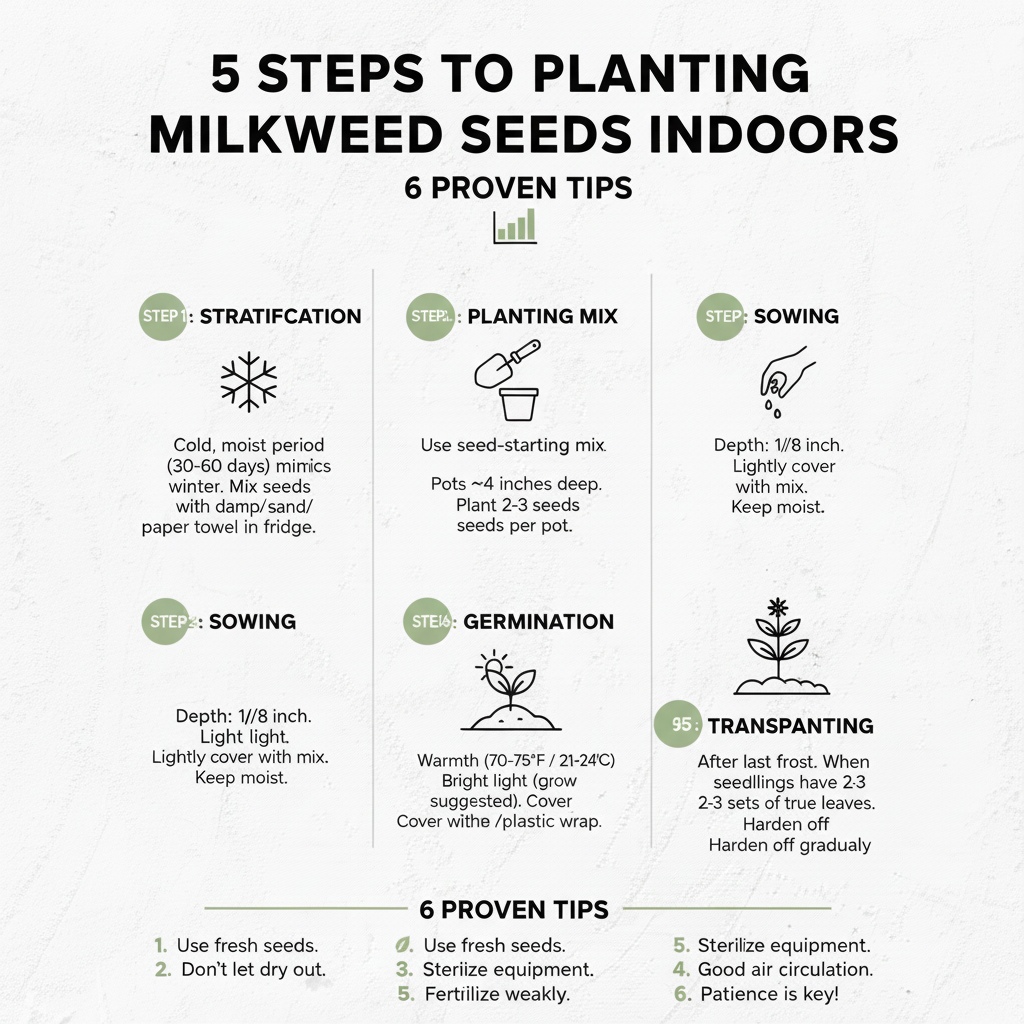
Planting milkweed seeds indoors is a crucial step for supporting monarch butterflies. Follow these five actionable steps to ensure successful germination, healthy seedlings, and a thriving garden that attracts these beautiful pollinators [1].
Table of Contents
Step 1: Gather Your Materials for Planting
Successful indoor planting of milkweed seeds begins with gathering the right materials. This ensures optimal conditions for germination and growth.
Essential Tools and Materials for Seed Starting
1. Seed Trays: Utilize 1020 seed trays or similar containers that allow for drainage. These trays provide adequate space for the seeds and promote healthy root development.
2. Seed Starting Mix: Choose a high-quality seed starting mix. This mix is designed to retain moisture while allowing for proper aeration and drainage, essential for germination [2].
3. Light Source: A reliable light source is critical. Use grow lights or place the trays in a south-facing window to ensure seedlings receive ample light for photosynthesis [3].
4. Watering Can or Spray Bottle: For gentle watering, use a watering can or spray bottle. This prevents soil displacement while keeping the mix evenly moist.
5. Labels: Clearly label your trays with the milkweed species and planting date. This helps track growth and care for different varieties.
6. Seed Starting Heat Mat: Consider using a seed starting heat mat. This device provides consistent warmth to enhance germination rates, especially important for milkweed Check Price on Amazon.
Advantages of Using Seed Starting Mix
Using seed starting mix instead of regular soil offers distinct advantages:
- Lightweight Composition: This mix is less dense and easier for seedlings to push through.
- Sterility: Commercial mixes are typically sterile, reducing the risk of pathogens that can harm young plants.
- Nutrient Balance: Seed starting mixes often include essential nutrients tailored for young plants, promoting healthier growth.
Checklist for Different Milkweed Species
Here’s a checklist tailored for popular milkweed species:
- Common Milkweed (Asclepias Syriaca):
- Requires a deeper container (at least 3 inches).
- Butterfly Weed (Asclepias Tuberosa):
- Prefers a lighter, well-draining mix; avoid overly moist conditions during germination.
- Swamp Milkweed (Asclepias Incarnata):
- Needs consistent moisture; consider using a humidity dome during the germination phase.
By gathering these materials and using quality seed starting mix, you set the foundation for robust milkweed seedlings, ultimately supporting the lifecycle of monarch butterflies.
Step 2: Prepare for Cold Stratification
Cold stratification is a crucial process for many milkweed species. It mimics winter conditions, breaking seed dormancy and improving germination rates. Here’s how to effectively carry it out indoors.
Understanding the Need for Cold Stratification
Not all milkweed species require cold stratification. However, for those that do, this process is vital. Cold stratification acts as nature’s alarm clock. It signals seeds to prepare for growth when warmer weather arrives. For example, common milkweed (Asclepias syrica) benefits significantly from this treatment, while tropical milkweed (Asclepias curassavica) does not require it at all [4].
Methods to Cold Stratify Seeds
There are several effective methods to cold stratify your milkweed seeds:
1. Moist Paper Towel Method:
- Place seeds between damp paper towels.
- Seal in a plastic bag to maintain humidity.
- Store in the refrigerator for 30 to 60 days.
2. Seed Starting Mix Method:
- Mix seeds with a moistened seed starting mix.
- Place in a sealed container or plastic bag.
- Refrigerate for 30 to 60 days.
3. Natural Outdoor Method (if weather permits):
- Sow seeds in a container outdoors.
- Let them experience natural winter conditions for 60 to 90 days.
Timing for Effective Stratification
The timing of cold stratification is crucial. Here’s a comparison of stratification times for different milkweed species:
| Milkweed Species | Stratification Time |
|---|---|
| Common Milkweed | 30-60 days |
| Swamp Milkweed | 30-60 days |
| Butterfly Weed | 30-60 days |
| Tropical Milkweed | Not required |
Start stratification about 6 to 8 weeks before the last expected frost date in your area. This timing ensures that your seeds will be ready to germinate when conditions are optimal for growth [4].
Equip your indoor planting setup with a Seed Starting Heat Mat to maintain consistent temperature levels, further enhancing germination success. Check Price on Amazon.
Step 3: Plant Your Milkweed Seeds
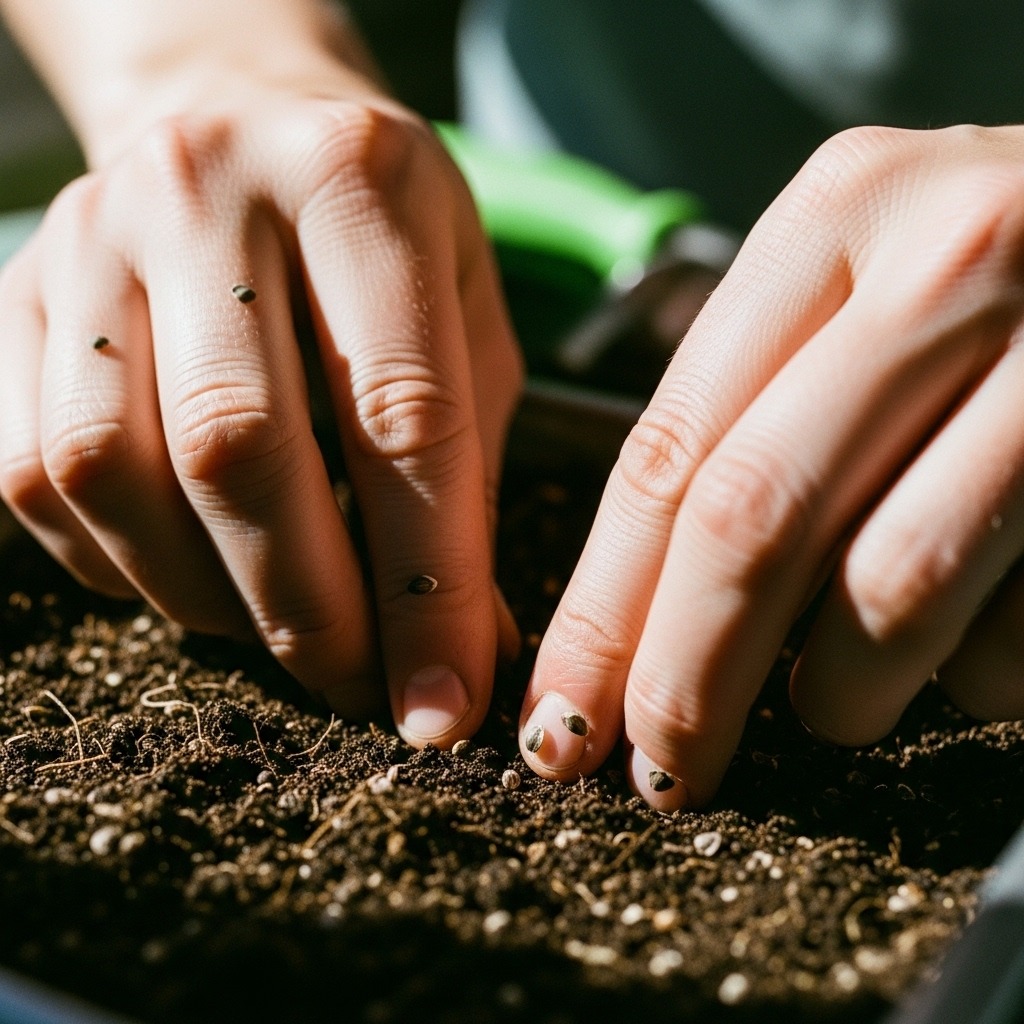
Now that you’ve stratified your milkweed seeds, it’s time to plant them indoors. This step is crucial for ensuring optimal growth and germination. Follow these detailed steps for successful planting.
Correct Planting Depth and Spacing
Understanding the right depth and spacing is essential for healthy seedlings.
- Depth: Plant milkweed seeds at a depth of about 1/4 inch to 1/2 inch. This depth allows them to access the moisture and nutrients they require for germination.
- Spacing: Space seeds approximately 12 inches apart. This spacing reduces competition for resources as the seedlings grow.
Soil Coverage Techniques
Proper soil coverage is key to successful germination. Here’s how to ensure your seeds are adequately covered:
1. Seed Starting Mix: Use a high-quality seed starting mix that retains moisture but offers good drainage.
2. Covering Seeds: After placing the seeds in the soil, gently press down to ensure good contact with the soil. Then, lightly sprinkle a thin layer of the mix over the seeds.
Best Practices for Watering
Watering is critical in the seedling stage. Adhere to these best practices:
- Initial Watering: Use a fine mist spray bottle to moisten the soil without displacing the seeds. Ensure the soil is damp but not waterlogged.
- Ongoing Care: Keep the soil consistently moist during germination. Check daily and water as needed. Overwatering can lead to rot, while underwatering can hinder growth.
Example of Varietal Considerations
Different milkweed species may have specific needs. For instance, Common Milkweed may require a slightly deeper planting depth due to its larger seed size. Always consider these nuances to optimize your planting strategy.
By adhering to these guidelines, you create the perfect environment for your milkweed seeds to thrive, supporting both their growth and the conservation of monarch butterflies.
Step 4: Maintain Optimal Growing Conditions
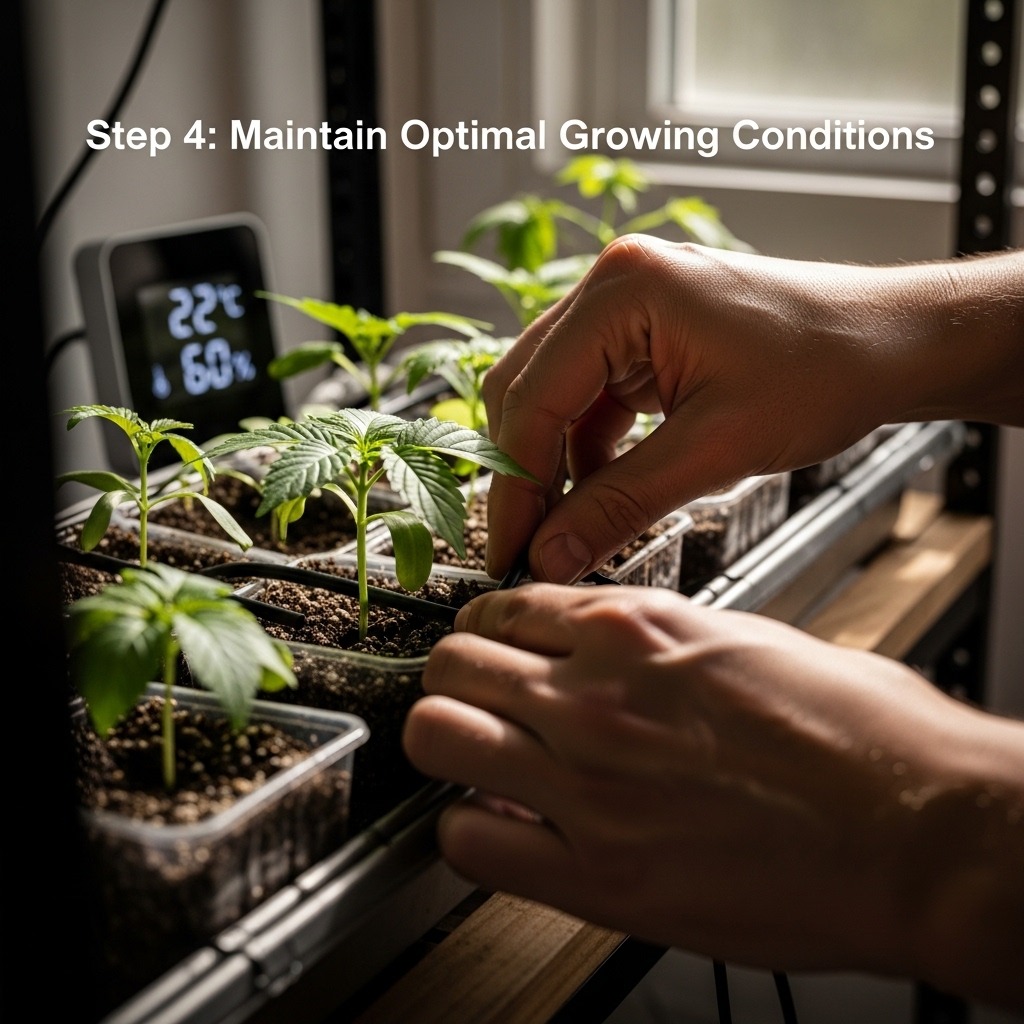
To successfully nurture milkweed seedlings indoors, you must create the right environmental conditions. Optimal light, temperature, and moisture levels are critical for robust growth and healthy plants.
Ideal Temperature and Humidity Levels
Milkweed seeds thrive in warm conditions. The optimal temperature range for germination is between 70°F and 85°F. Maintaining consistent warmth encourages rapid sprouting. Humidity also plays a vital role in seedling health. Aim for humidity levels around 50-70%.
- Temperature: 70°F to 85°F
- Humidity: 50% to 70%
For example, you can use a heat mat to maintain warmth during the germination phase. This technique accelerates growth while ensuring seeds don’t languish in cold conditions.
Importance of Light Exposure
Light is non-negotiable for seedling success. Milkweed seedlings require 14 to 16 hours of light daily. If natural sunlight is insufficient, supplement with grow lights. Position them just a few inches above the seedlings to prevent weak, leggy growth.
- Natural Light: At least 6 hours of direct sunlight
- Grow Lights: 14-16 hours daily, placed a few inches above seedlings
Using grow lights effectively can transform your indoor environment. For instance, adjust the height of the lights based on seedling height. If seedlings stretch towards the light, lower the grow light to encourage sturdier growth.
Watering Techniques to Avoid Overwatering
Water management is crucial. Milkweed seedlings prefer consistently moist soil but can easily suffer from overwatering. Check the soil daily. If the top inch feels dry, it’s time to water.
- Watering Frequency: Check daily
- Soil Moisture: Keep consistently damp but not soggy
Consider using a moisture meter for precision. This tool can guide your watering schedule, ensuring you provide just the right amount of moisture without the risk of root rot.
By understanding and adjusting these environmental factors, you can ensure your milkweed seedlings receive the best possible start, setting the stage for a thriving garden that supports monarch butterflies.
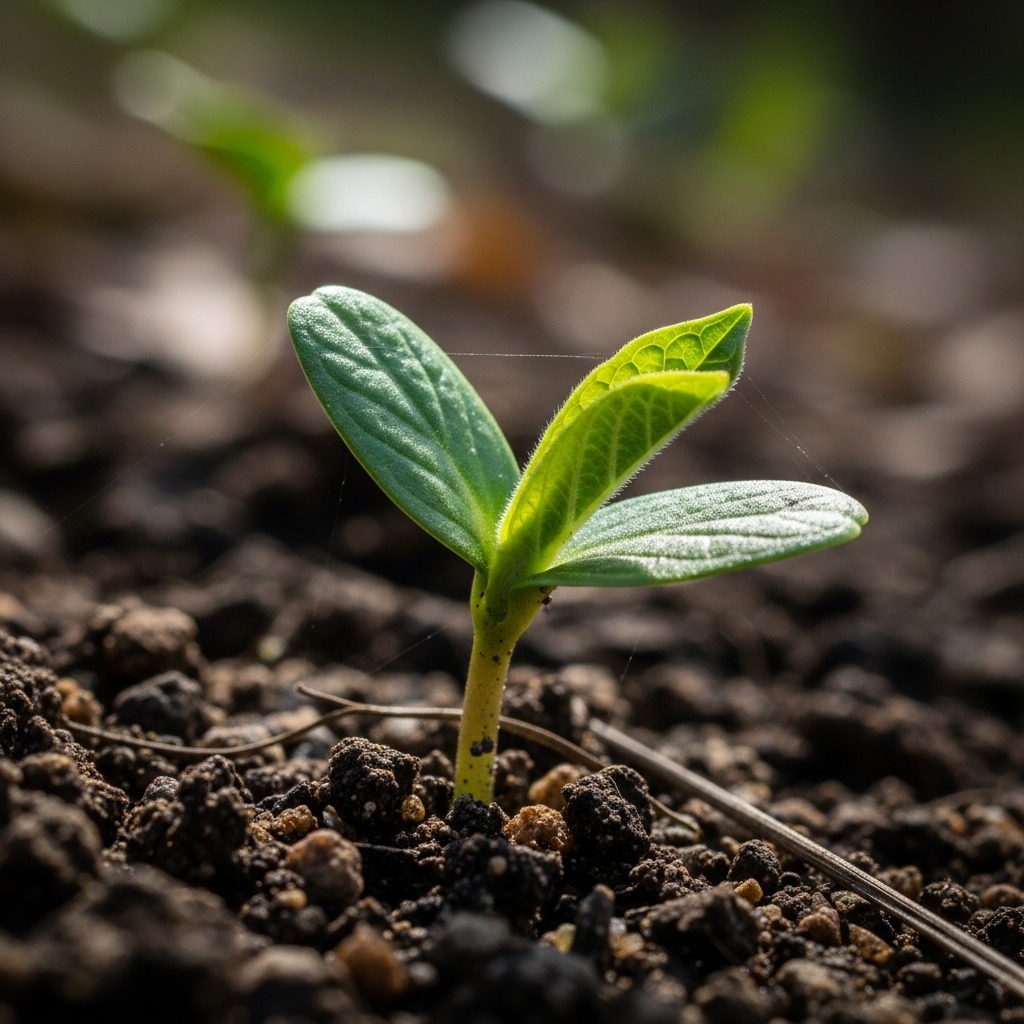
Step 5: Care for Your Seedlings
Caring for milkweed seedlings is critical to their successful growth. This includes proper fertilization, pest management, and timely transplanting. Here’s how to ensure your seedlings thrive.
Signs of Healthy Seedlings
Monitor your seedlings for key indicators of health:
- Vibrant Color: Leaves should be a rich green, indicating robust growth.
- Strong Stems: Sturdy stems stand upright and support the foliage.
- True Leaves Development: Look for at least two sets of true leaves before considering transplanting.
When and How to Fertilize
Fertilization boosts seedling growth. Begin fertilizing when seedlings develop their second set of true leaves. Use a balanced fertilizer diluted to half strength. Apply every two weeks. This practice enhances nutrient absorption and promotes stronger plants [9].
Checklist for Fertilization:
- Timing: Start at the second set of true leaves.
- Type: Use a balanced, water-soluble fertilizer.
- Frequency: Every two weeks, at half strength.
Preparing Seedlings for Outdoor Transition
Transitioning your seedlings outdoors is crucial. This process, known as hardening off, acclimates seedlings to outdoor conditions. Follow these steps:
1. Start Gradually: Begin with 1-2 hours of shade each day.
2. Increase Exposure: Gradually increase sunlight and wind exposure over 7-10 days.
3. Monitor Temperatures: Ensure nighttime temperatures are consistently above freezing before moving seedlings outside [11].
Troubleshooting Common Seedling Issues
Even with the best care, issues can arise. Here are common problems and solutions:
- Leggy Seedlings: Often a sign of insufficient light. Increase light exposure.
- Yellowing Leaves: Indicates overwatering or nutrient deficiency. Adjust watering and consider fertilization.
- Pests: Watch for aphids and spider mites. Use organic pest control methods to prevent damage [10].
By following these guidelines, you can ensure your milkweed seedlings are strong and ready for a successful transition to the outdoors.
Step 6: Common Issues and Troubleshooting
Starting milkweed seeds indoors can lead to challenges, but understanding these common issues and their solutions will greatly enhance your success. Below are some critical areas to focus on when troubleshooting your indoor milkweed planting.
Identifying and Solving Germination Problems
Germination issues are common when starting milkweed seeds indoors. Here are the main culprits and their solutions:
- Poor Seed Quality: Always check the expiration date on your seed package. Old seeds may have reduced viability, leading to poor germination rates.
- Incorrect Planting Depth: Milkweed seeds should be planted at a depth of about ¼ inch. Planting too deep can hinder their ability to sprout.
- Insufficient Cold Stratification: Milkweed seeds benefit from a cold treatment. Place them in the refrigerator for at least four weeks before planting to simulate winter conditions [12].
A real-life example: A gardener found that their seeds failed to germinate after planting them without stratification. After following the cold treatment protocol, their germination rate improved significantly.
Managing Pests and Diseases
Pests and diseases can threaten your seedlings. Here’s how to manage them effectively:
- Aphids and Spider Mites: Regularly inspect your seedlings. Use organic pest control methods, such as insecticidal soap or neem oil, to keep these pests at bay.
- Fungal Diseases: Ensure good airflow around your seedlings to prevent damp conditions. Overhead watering can lead to fungal growth. Water at the base instead.
For instance, one gardener reported a severe aphid infestation on their milkweed seedlings. By introducing ladybugs—a natural predator—they successfully eradicated the pests without chemicals.
Adjusting Care Based on Environmental Factors
Environmental factors play a crucial role in the health of your seedlings. Adjust your care as needed:
- Light Exposure: If seedlings appear leggy, increase their exposure to light. Ideally, they should receive 12-16 hours of light daily, either from a sunny window or grow lights.
- Temperature Fluctuations: Maintain consistent temperatures, ideally between 70°F and 75°F. Sudden changes can stress seedlings and hinder growth.
Consider a checklist for optimal conditions:
- Check seed viability.
- Verify planting depth.
- Implement cold stratification.
- Monitor light duration and intensity.
- Inspect regularly for pests and diseases.
By being proactive and addressing these common issues, you’ll pave the way for healthy milkweed seedlings ready for outdoor planting.
Frequently Asked Questions
These quick answers cover the most common questions about this topic, including key details, practical tips, and common concerns.
How do you start milkweed seeds indoors?
Begin by gathering quality seed starting mix, seed trays, grow lights, and labels. If your species requires cold stratification, refrigerate the seeds in a moist medium for 30-60 days beforehand. Plant the seeds about 1/4 to 1/2 inch deep in moist soil, spacing them appropriately. Provide ample light and maintain warm temperatures to encourage germination.
How long does it take for milkweed seeds to germinate indoors?
Germination typically occurs within 7 to 30 days, depending on the species and whether cold stratification was performed. Seeds that have undergone stratification tend to sprout more quickly and uniformly. Keep the soil consistently moist and maintain optimal warmth for best results.
Can I plant milkweed in October?
Planting milkweed in October is possible in milder climates if you’re using indoor methods. However, for outdoor sowing, it’s better to wait until late winter or early spring after the last frost. Starting seeds indoors in late winter allows you to transplant seedlings outdoors when conditions are ideal.
Should milkweed seeds be soaked before planting?
Soaking milkweed seeds before planting is optional but can enhance germination, especially for species that benefit from cold stratification. Soak seeds in warm water for 12-24 hours to soften the seed coat. For species requiring cold stratification, soaking can be combined with refrigeration for better results.
What is the best soil for planting milkweed seeds?
Use a high-quality, well-draining seed starting mix. It should be light, sterile, and retain moisture without becoming soggy. This creates ideal conditions for germination and early seedling growth, reducing the risk of fungal diseases.
How do I care for milkweed seedlings indoors?
Keep seedlings in a bright location with 14-16 hours of light daily, using grow lights if necessary. Maintain temperatures between 70°F and 75°F and keep the soil evenly moist. Fertilize lightly once seedlings develop their second true leaves and gradually harden them off before outdoor planting.
When is the best time to transplant milkweed seedlings outdoors?
Transplant seedlings outdoors after the last frost date in your area, typically when nighttime temperatures stay above 50°F. Harden off seedlings gradually over 7-10 days by exposing them to outdoor conditions incrementally. This helps prevent transplant shock and supports healthy establishment.
Why should I plant milkweed?
Planting milkweed supports monarch butterfly populations by providing essential breeding and feeding habitat. It also attracts pollinators and adds native, low-maintenance plants to your garden. Supporting native plants like milkweed is vital for ecosystem health and biodiversity.
What should I know about visual guides for seedling care (images or diagrams)?
Visual guides can help identify healthy seedlings, proper watering, and growth stages. Diagrams showing seed depth, spacing, and lighting setup are valuable for ensuring correct techniques. Many gardening resources and extension services provide helpful images to improve your success.
What should I know about detailed descriptions of each milkweed species?
Different milkweed species have unique growth habits, soil preferences, and environmental needs. For example, common milkweed (Asclepias syriaca) is tall and hardy, while butterfly weed (Asclepias tuberosa) prefers well-drained, sandy soils. Understanding these differences helps tailor your planting and care strategies for optimal growth.
References
1. Starting Seeds: Essential Tools & Tips – UF/IFAS Blogs
2. Cut Veggie Garden Costs by Making Your Own Seed …
3. Lighting for indoor plants and starting seeds
4. Seed stratification: What seeds require cold treatment
5. Milkweed Plug Planting Instructions
6. Growing Seedlings Under Lights [Fact Sheet] – UNH Extension
7. Common milkweed – Cornell CALS
8. Seed Moisture as an Indication of Harvest Readiness
9. Fertilizing Bedding Plant Seedlings
11. Plant Milkweed for Monarchs
12. Milkweed and Milkweed Toxicity – Wisconsin Horticulture
13. How to collect and grow milkweeds to help monarchs and …