
You can easily grow a potato plant from a potato by using seed potatoes, which are specially prepared tubers that can sprout and produce new plants. I’ve done it myself, and it’s a rewarding process that anyone with a little patience can enjoy. Read Interesting article: How Long Do Potato Plants Take to Grow? Timeline Guide
Understanding Potatoes: The Basics
Let’s dive into the wonderful world of potatoes. They’re not just a staple food; they’re also a fun and easy plant to grow in your garden or even in containers. Knowing the basics about potatoes can make your growing experience much more enjoyable. From types and varieties to the significance of seed potatoes, let’s explore.
Types of Potatoes for Planting
When it comes to planting potatoes, not all potatoes are created equal. There are primarily two types you should know about: determinate and indeterminate potatoes. I remember feeling a bit overwhelmed by all the choices, but here’s a simple breakdown:
- Determinate Potatoes: These potatoes grow to a certain height and then stop. They tend to produce a single crop, which is great for those who want to harvest all at once. Varieties like ‘Yukon Gold’ and ‘Red Pontiac’ fall into this category.
- Indeterminate Potatoes: These continue to grow and produce potatoes throughout the season. I found these to be ideal if you want a longer harvest period. Varieties such as ‘Russet Burbank’ and ‘Purple Majesty’ are popular indeterminate choices.
Potato Varieties: Choosing the Right One
Choosing the right variety can significantly affect your success in growing potatoes. I’ve tried a few varieties, and here’s what I discovered:
- Early Varieties: Perfect for those who want to harvest potatoes sooner. Varieties like ‘First Early’ can be ready in as little as 70 days.
- Maincrop Varieties: These take longer to mature but yield more potatoes. ‘Kenton’ and ‘Maris Piper’ are well-known for their excellent yields and storage capabilities.
- Specialty Varieties: If you’re feeling adventurous, try growing colorful potatoes like ‘Blue Potatoes’ or ‘Fingerlings’. They can add a unique twist to your meals.
The Importance of Seed Potatoes
Seed potatoes are crucial for successful potato cultivation. I learned that using certified seed potatoes is essential because they are disease-free and have been specifically grown for planting. Unlike regular potatoes from the grocery store, seed potatoes are selected for their ability to grow and produce healthy plants. I remember the first time I used seed potatoes; the results were incredible, with robust plants and a bountiful harvest.
Preparing to Grow Potatoes
Once you’ve got your head wrapped around the basics, it’s time to prepare for planting. I always found that a little preparation goes a long way in ensuring a successful potato crop. From choosing the right location to soil requirements, here’s what you need to know.
Choosing the Right Location
Potatoes thrive in areas with full sun, so I make sure to pick a spot that gets at least 6 to 8 hours of direct sunlight each day. I’ve found that a spot with good air circulation helps prevent disease. Also, consider accessibility; you’ll want to be able to tend to your plants easily. Raised beds or containers can be great options if space is limited.
Soil Requirements for Potatoes
Potatoes prefer loose, well-drained soil that’s rich in organic matter. I usually amend my soil with compost to provide the nutrients that potatoes need. The pH level should ideally be between 5.8 and 6.5. I remember one year when I didn’t test my soil, and the results were less than stellar. A quick soil test can save you a lot of headaches down the road.
Gathering Necessary Tools and Materials
Before you start planting, make sure you have all the tools and materials you need. From my experience, here’s a handy checklist:
- Seed potatoes
- Garden spade or fork
- Rake
- Compost or organic fertilizer
- Mulch (straw or grass clippings)
- Watering can or hose
Having everything ready makes the planting process smoother and more enjoyable. I often find that gathering the tools becomes part of the gardening experience itself.
Steps to Grow a Potato Plant from a Potato
Growing a potato plant from seed potatoes is a straightforward yet fulfilling process. I remember feeling a big sense of accomplishment when I first saw those little sprouts emerging from the soil. Each step plays a crucial role, and I want to share my experiences to help you along the way.
Step 1: Chitting Potatoes
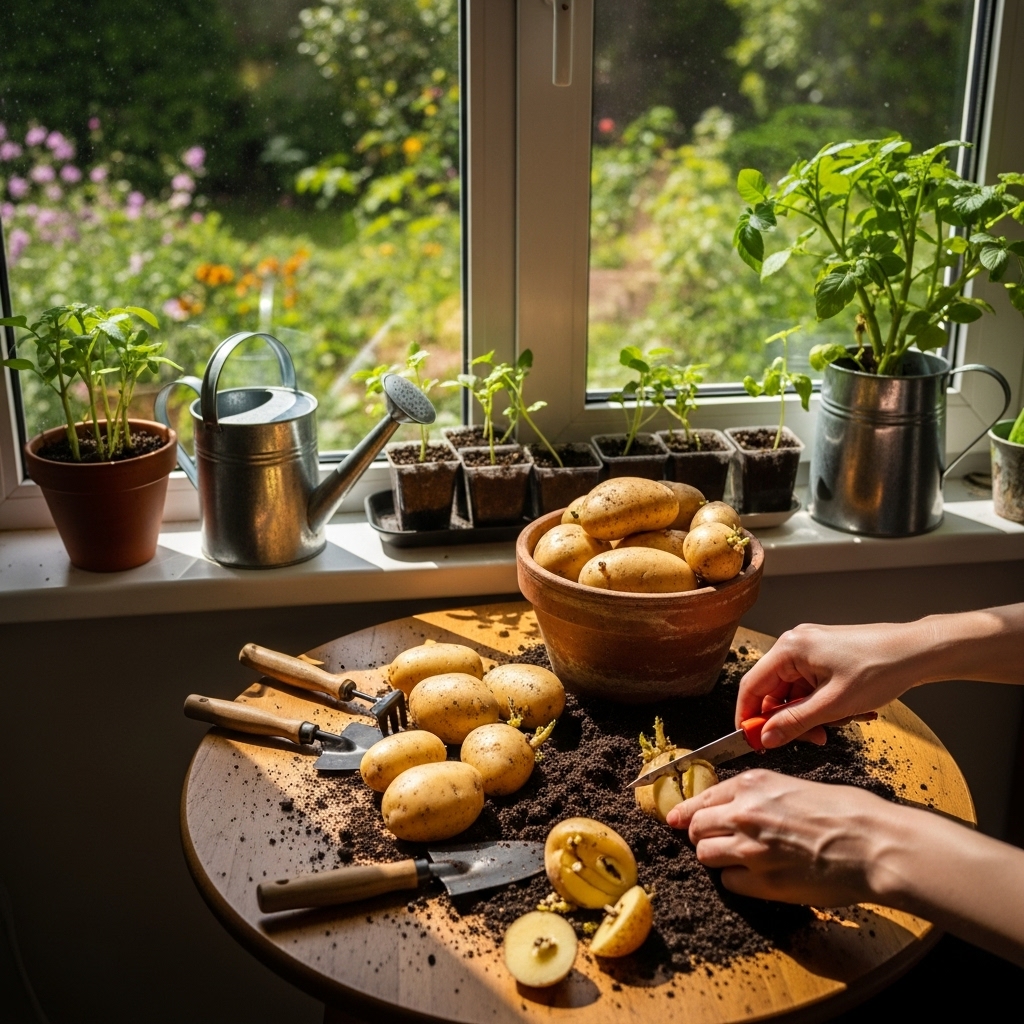
Chitting is the first step in the potato-growing process. This involves allowing your seed potatoes to sprout before planting. I usually place my seed potatoes in a cool, light area, like a sunny windowsill, for a couple of weeks. You’ll notice little shoots starting to form, which is a sign that they’re ready to grow. I’ve found that chitting helps to give the plants a head start, leading to quicker growth once they’re in the ground.
Step 2: Cutting and Preparing Seed Potatoes
Once your potatoes have sprouted, it’s time to prepare them for planting. If your seed potatoes are larger than the size of a golf ball, you can cut them into pieces, making sure each piece has at least one or two sprouts. I always remember to let the cut pieces sit for a day or two to dry out a bit; this helps prevent rot once they’re planted. It’s amazing how such small preparations can make a big difference in the health of your plants!
Step 3: Planting Potatoes in the Ground
Now, we get to the fun part—planting! I usually plant my seed potatoes in the spring, once the danger of frost has passed. Digging a trench about 4 to 6 inches deep, I place the seed potato pieces, sprout side up, about 12 inches apart. Then, I cover them with soil, patting it down lightly. I often feel a mix of excitement and anticipation at this stage, knowing that in just a few months, I’ll be digging up delicious potatoes!
Step 4: Watering and Fertilizing
After planting, keeping your potatoes well-watered is essential. I try to maintain moist soil but avoid overwatering, as soggy conditions can lead to rot. Generally, I check the soil every few days and make adjustments based on the weather. As for fertilizing, I like to use an organic fertilizer about two weeks after planting. It gives my plants a little extra boost, promoting healthy growth. I remember thinking how vibrant and lively my plants looked after a good feeding!
Step 5: Hill Up Your Potato Plants
As your potato plants grow, they’ll develop tall green foliage. This is where hilling comes into play. I usually add a mound of soil around the base of the plants when they reach about 6 inches tall. This process encourages the plants to produce more tubers and protects the developing potatoes from sunlight, which can turn them green and bitter. I find it satisfying to see my plants standing tall and healthy, knowing I’m doing everything right.
Caring for Your Potato Plants
After planting, the journey doesn’t end. Taking care of your potato plants is crucial to ensure a successful harvest. From my experience, being attentive to their needs really pays off.
Pest and Disease Management
Pests can be a real nuisance in the garden, and I’ve had my fair share of battles. Common pests like aphids and Colorado potato beetles can wreak havoc on your plants. I typically check my plants regularly for any signs of pests. If I spot any, I try to remove them by hand or use an insecticidal soap to manage the situation. It’s a bit of a chore, but I like knowing that I’m protecting my plants. Additionally, rotating where I plant my potatoes each year helps prevent diseases and pest issues from building up in the soil.
Watering Schedule for Potatoes
Establishing a consistent watering schedule is essential for healthy potato plants. I usually water my potatoes deeply once a week, especially during dry spells. However, if it’s particularly hot or windy, I adjust by checking the soil moisture more frequently. My rule of thumb is to ensure that the soil stays consistently moist—neither too wet nor too dry. When I’ve neglected watering, I’ve noticed the plants struggling, which reminds me of the importance of this step!
Signs of Healthy Potato Plants
As I care for my potato plants, I’ve learned to look for certain signs that indicate they’re thriving. Healthy potato plants typically have lush, green foliage and strong stems. If I notice the leaves turning yellow or wilting, it often signals a problem, whether it be pests, disease, or inadequate water. I make it a point to stay observant and address any issues promptly. It’s all part of the rewarding garden journey that keeps me coming back year after year.
Harvesting Potatoes
After all the hard work and care, the moment we’ve all been waiting for finally arrives: harvesting our potatoes! I remember the thrill I felt the first time I dug into the soil and pulled out those beautiful tubers. It’s not just a reward for my efforts; it’s like unearthing hidden treasure. Here’s what you need to know to make the most of your harvest.
When to Harvest Potatoes
Timing is everything when it comes to harvesting potatoes. I’ve learned that the best time to harvest depends on the type of potatoes you’ve planted. For early varieties, I usually start checking around 70-90 days after planting. You’ll know they’re ready when the plants begin to yellow and die back. For maincrop varieties, I wait a bit longer—around 100 to 120 days—until the foliage has completely died down. I find that gently digging a few potatoes to check their size is a good way to gauge readiness. It’s a little like a treasure hunt!
How to Harvest Potatoes Safely
Harvesting potatoes is a delicate process. I always use a garden fork or spade to lift them out of the ground carefully. You must be cautious not to pierce the tubers, as this can lead to spoilage. I start digging about a foot away from the base of the plant to avoid damaging the potatoes. When I uncover them, it’s so satisfying to see the harvest reveal itself! I’ve learned to be gentle and take my time during this process—after all, these potatoes are the fruits of my labor.
Post-Harvest Handling and Storage
Once the potatoes are harvested, the next step is handling them correctly. I usually lay them out in a cool, dark place for a few hours to dry and cure. This helps toughen their skin and improves storage longevity. I remember one year when I didn’t let them cure properly, and a good portion of my crop spoiled quickly. To store them, I prefer using burlap sacks or cardboard boxes with ventilation holes. Keeping them in a cool, dark area is crucial—ideally around 45°F to 50°F. I always check them regularly for any signs of spoilage and remove any affected potatoes to prevent the spread.
Common Questions About Growing Potatoes
Can I Grow Potatoes in Containers?
Absolutely! I’ve tried growing potatoes in containers, and it can be a great option, especially for those with limited space. I recommend using large pots or fabric grow bags, as they allow for good drainage. The process is similar to planting in the ground: fill the container with soil, plant the seed potatoes, and water them regularly. I’ve found that container-grown potatoes can be just as productive, plus they’re easier to manage and protect from pests! Read Interesting article: How to Grow a Sweet Potato Plant at Home
What Should I Do if My Potatoes are Small?
If you find that your potatoes are smaller than you expected, don’t worry—it happens! From my experience, small potatoes can often be a result of insufficient watering, nutrient deficiencies, or overcrowding. I suggest checking the watering schedule and ensuring that your potatoes have enough nutrients in the soil. If overcrowding is an issue, I recommend allowing more space between seed potatoes in future plantings. Smaller potatoes can still be delicious and are perfect for roasting or making salads!
How to Store Seed Potatoes for Next Season
If you’re planning to grow potatoes again, it’s essential to store your seed potatoes properly. After harvesting, I let them cure for a week or so, then I choose the best-looking ones for next year. I keep them in a cool, dark space, similar to how I store harvested potatoes, ensuring they are in a well-ventilated container. I make sure to check on them periodically and remove any that show signs of damage. This way, I’m prepared for a successful planting season next year!
Potato Plant Troubleshooting
Common Problems and Solutions
Even with the best care, potato plants can face challenges. I’ve encountered a few common problems that I want to share, along with my solutions. One issue I’ve faced is poor growth, which I usually attribute to nutrient deficiencies. In these cases, adding compost or a balanced fertilizer can often help. If I notice yellowing leaves, it could indicate a lack of nitrogen, so I try to address that quickly. I’ve learned that being proactive about these signs can save my crop!
Identifying and Treating Potato Diseases
Potatoes are susceptible to a few diseases, such as late blight and early blight. I remember one year when late blight struck my garden; it was devastating. To help minimize the risk, I practice crop rotation and ensure good air circulation around my plants. If I spot any signs of disease, I act quickly by removing affected leaves and using organic fungicides when necessary. It’s a bit of work, but I find that staying vigilant really pays off in the long run.
Managing Pest Infestation
Pests can be a real pain, as I mentioned earlier. When I see signs of a pest infestation, like holes in the leaves or little beetles, I take action right away. I often use a combination of handpicking pests and applying organic insecticides as needed. I’ve learned that companion planting can also help deter some pests. For example, planting marigolds alongside potatoes can be beneficial. It’s all about finding what works best in your garden! Read Interesting article: How Deep to Plant Potatoes for Best Growth
Frequently Asked Questions
What are seed potatoes and why are they important?
Seed potatoes are specially prepared tubers that can sprout and produce new plants. They are crucial for successful potato cultivation because certified seed potatoes are disease-free and specifically grown for planting, unlike regular potatoes from the grocery store.
What are the two main types of potatoes for planting?
The two main types of potatoes for planting are determinate and indeterminate potatoes. Determinate potatoes grow to a certain height and produce a single crop, while indeterminate potatoes continue to grow and produce throughout the season.
How can I prepare my seed potatoes before planting?
To prepare seed potatoes, you can chit them by allowing them to sprout in a cool, light area for a couple of weeks. If they are larger than a golf ball, you can cut them into pieces, ensuring each piece has at least one or two sprouts, and let them dry for a day or two before planting.
What are the soil requirements for growing potatoes?
Potatoes prefer loose, well-drained soil rich in organic matter, with an ideal pH level between 5.8 and 6.5. Amending the soil with compost can provide the necessary nutrients for healthy potato growth.
When is the best time to harvest potatoes?
The best time to harvest potatoes depends on the type planted. Early varieties can be harvested around 70-90 days after planting, while maincrop varieties are typically ready around 100-120 days when the foliage has completely died back.
What should I do if my potatoes are smaller than expected?
Small potatoes can result from insufficient watering, nutrient deficiencies, or overcrowding. It’s advisable to check the watering schedule, ensure adequate nutrients in the soil, and allow more space between seed potatoes in future plantings.
How should I store harvested potatoes?
After harvesting, lay the potatoes out in a cool, dark place for a few hours to dry and cure. Store them in burlap sacks or cardboard boxes with ventilation holes, keeping them in a cool, dark area around 45°F to 50°F.
What are common pests that affect potato plants?
Common pests affecting potato plants include aphids and Colorado potato beetles. Regularly checking for pests and using methods like hand removal or insecticidal soap can help manage infestations.
What steps can I take to care for my potato plants?
Caring for potato plants involves establishing a consistent watering schedule, checking for pests and diseases, and ensuring they have adequate nutrients. Observing the plants for signs of health or distress is crucial for a successful harvest.
Can I grow potatoes in containers?
Yes, potatoes can be grown in containers, making it a great option for those with limited space. Using large pots or fabric grow bags allows for good drainage and a similar planting process as in the ground.