
Growing ginger plants at home is both rewarding and straightforward, requiring just a few simple steps. I’ve found that with the right conditions and care, anyone can cultivate this aromatic herb in their kitchen or garden. Read Interesting article: A Garden That Gives Back: The Ultimate Guide to Planting Your Own Ginger and Turmeric
Table of Contents
Understanding Ginger Plants
What is Ginger? (Zingiber officinale)
Ginger, scientifically known as Zingiber officinale, is a flowering plant that belongs to the family Zingiberaceae. It’s native to Southeast Asia and is best known for its rhizome, which is the part we often use in cooking and for medicinal purposes. Ginger has a unique flavor and aroma that can enhance the taste of various dishes, from savory to sweet. I remember the first time I grated fresh ginger into a stir-fry; the fragrance filled my kitchen and made the meal unforgettable.
Benefits of Growing Ginger at Home
There are numerous benefits to growing ginger at home. Firstly, it allows you to have a fresh supply of this versatile spice at your fingertips. There’s something special about harvesting your own ingredients; the taste is often richer and more vibrant than store-bought options. Additionally, ginger is known for its health benefits, including aiding digestion, reducing nausea, and possessing anti-inflammatory properties. I’ve often turned to ginger tea whenever I’ve felt under the weather, and knowing I can grow it myself makes it feel even more special. You can find more information on health benefits in Planting a Spring Herb Garden: Guide for Herbal Teas.
Common Varieties of Ginger
While the most commonly used ginger is the culinary variety, there are several types of ginger you can consider growing. Some popular varieties include:
- Common Ginger: This is the ginger we typically find in grocery stores, with a spicy flavor that varies in intensity.
- Turmeric: Often considered a cousin to ginger, turmeric is known for its vibrant yellow color and health benefits.
- Galangal: A less common variety with a more citrusy flavor, galangal is often used in Southeast Asian cooking.
- Yellow Ginger: Known for its slightly milder taste, yellow ginger is also used for medicinal purposes.
Choosing a variety depends on your culinary preferences and the type of dishes you enjoy preparing. I love experimenting with different varieties to see how they influence the flavor profiles of my meals.
Getting Started with Ginger Planting
Choosing the Right Ginger Root
The first step in growing ginger is selecting the right ginger root, or rhizome, to plant. Look for fresh, plump roots at your local grocery store or farmer’s market. The rhizome should have visible “eyes,” which are small buds that indicate where new growth will emerge. I often search for pieces that feel firm and have a vibrant color. If you can find organic ginger, that’s even better, as it’s less likely to have been treated with chemicals that might hinder growth.
Where to Buy Ginger Seeds or Rhizomes
You can purchase ginger rhizomes from various places. Grocery stores are a convenient option, but I prefer to buy from local farmers’ markets or specialty gardening stores when I can. Some online gardening shops also offer quality ginger seeds. I’ve noticed that buying from these sources often yields better results, as they may provide fresher roots that are more likely to sprout. Just ensure that whatever you buy is labeled as suitable for planting.
Preparing the Ginger Root for Planting
Before planting, it’s essential to prepare the ginger root. If you’ve purchased a larger rhizome, you can cut it into smaller pieces, ensuring each piece has at least one or two eyes. I usually let the cut pieces dry for a day or two; this helps to form a protective callus, which can prevent rot once it’s planted. After they’ve dried, it’s time to get them into the soil!
Optimal Growing Conditions
Soil Requirements for Ginger Plants
Ginger thrives in well-draining, loamy soil that is rich in organic matter. I like to mix regular potting soil with compost to ensure it has the nutrients needed for healthy growth. The soil pH should ideally be between 6.0 and 6.5. If you’re planting in a pot, ensure it has drainage holes to prevent water from sitting at the bottom. I learned the hard way that soggy soil can lead to root rot, which is something you definitely want to avoid.
Best Climate for Ginger Growth
Ginger flourishes in warm, humid climates, typically thriving in temperatures between 70°F and 85°F. If you live in a cooler area, don’t worry! You can easily grow ginger indoors or in a greenhouse where you can control the temperature. I’ve found that even a small sunny spot in my home works wonders, especially during the colder months. Just be mindful of extreme temperature fluctuations, as ginger doesn’t like cold drafts.
Light and Temperature Needs
Ginger prefers partial shade to full sun, making it perfect for places that receive dappled sunlight. I usually place my ginger pots in a spot where they get morning sun and some afternoon shade. This balance helps the plants thrive without the risk of scorching the leaves. Keeping the temperature consistent is key; I’ve noticed that ginger roots grow best when they are kept warm and cozy, just like we would want for ourselves!
Planting Ginger: Step-by-Step Guide
When to Plant Ginger
Timing is everything when it comes to planting ginger. I’ve found that the best time to plant ginger rhizomes is in the spring, after the last frost has passed. This gives the plants a full growing season to establish themselves and thrive. In warmer climates, you might even be able to plant ginger earlier, as soon as the soil warms up. I remember planting my ginger in late April one year, and by the end of the summer, I had lush, green shoots bursting through the soil. Watching them grow was a rewarding experience!
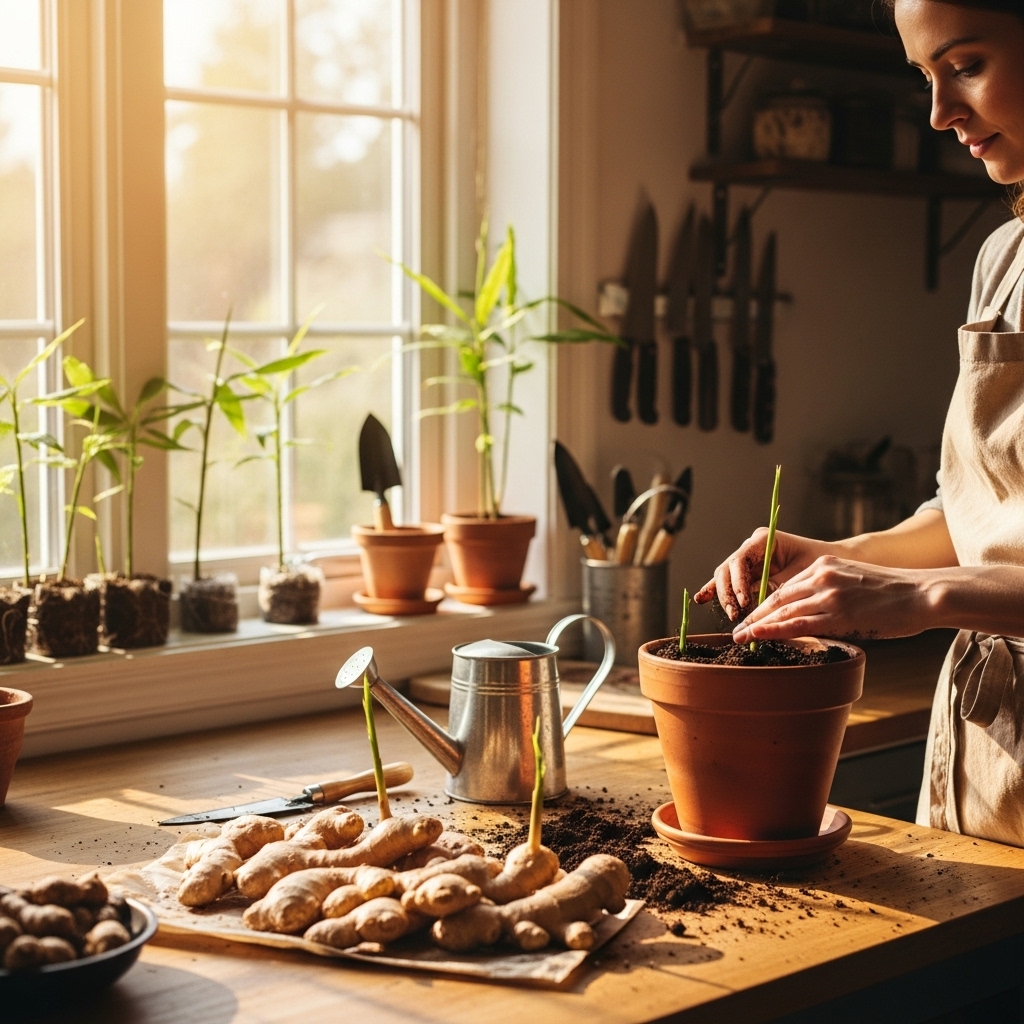
How to Plant Ginger in Pots
If you’re opting to plant ginger in pots, it’s a simple and manageable process. First, choose a pot that’s at least 12 inches wide and deep. I personally love using terracotta pots because they allow for good airflow to the roots. Fill the pot with your prepared soil mixture, then make a shallow hole about two inches deep. Place the ginger root in the hole with the eyes facing upwards, then cover it lightly with soil. Water gently to settle the soil, but be careful not to soak it. I always keep my pots in a warm spot where they can receive adequate light, but not direct harsh sunlight, to help kickstart their growth!
Transplanting Ginger into the Garden
If you prefer to plant ginger in your garden, ensure that the soil is well-draining and has been enriched with organic matter. I like to dig a trench that’s about three to four inches deep and place the ginger roots in with the eyes facing upward, similar to how I would in pots. After covering them with soil, I give them a good drink of water. It’s crucial to space the ginger about 12 inches apart because they need room to grow. I remember being impatient and cramming them too close together once, which resulted in smaller rhizomes. Lesson learned: they appreciate their personal space!
Care and Maintenance of Ginger Plants
Watering Guidelines
Watering is a key factor in the care of ginger plants. They love moisture but can be sensitive to overwatering. I’ve made it a habit to check the soil before watering; if the top inch feels dry, it’s time to give them a drink. Usually, I water my ginger plants deeply once a week, but this can vary depending on the climate. I’ve noticed that during hotter months, I might need to water more frequently, sometimes even every few days. Keeping the soil consistently moist but not soggy has really helped my ginger thrive.
Fertilizing Ginger Plants
To keep my ginger plants healthy, I make sure to fertilize them regularly. I typically use a balanced, organic fertilizer every four to six weeks during the growing season. It’s amazing how a little extra nutrition can boost their growth! I’ve learned that too much fertilizer can lead to lush foliage but poor root development, so I stick to recommended amounts. I enjoy mixing my fertilizer into the top layer of soil to encourage good absorption. Watching my plants respond positively to this care is always rewarding!
Pest and Disease Management
While ginger is relatively resilient, it can still fall victim to pests and diseases. I’ve encountered issues with aphids and spider mites in my garden, but I found that gently spraying the plants with a mixture of water and mild soap can help keep them at bay. Additionally, I try to maintain good air circulation around the plants and avoid overcrowding, which can lead to fungal diseases. If I notice any yellowing leaves or signs of distress, I take immediate action to assess the problem. Early detection has saved my ginger plants more than once!
Harvesting Ginger
When to Harvest Ginger
Ah, the moment we all wait for—the harvest! Ginger is usually ready for harvesting about 8 to 10 months after planting. I keep an eye out for the leaves, which will start to yellow and die back when the rhizomes are mature. The first time I harvested my ginger, I was so excited that I pulled it up a little too early. The flavor was milder than I expected, but it was still a thrilling experience! I’ve learned to be patient, as letting the ginger grow fully develops that robust taste we all love.
How to Harvest Ginger Without Damaging the Plant
When it’s time to harvest, I recommend using a garden fork or shovel to gently pry up the rhizomes. I always approach this with care to avoid damaging the roots and surrounding plants. Starting at the edge of the plant, I carefully lift the soil to expose the rhizomes. It’s like unearthing a treasure! I usually harvest a few pieces and leave the rest in the ground to continue growing. This way, I can enjoy fresh ginger for several months while allowing some to mature further.
Storing Fresh Ginger
After harvesting, storing your fresh ginger properly is essential to maintain its flavor and freshness. I typically wrap my ginger in a paper towel and place it in a paper bag, keeping it in the refrigerator. This method helps prevent it from spoiling too quickly. I’ve also discovered that if I don’t plan to use it right away, I can freeze ginger by slicing it into pieces or grating it first. This way, I always have ginger on hand, ready to add that special kick to my recipes!
Common Issues and Troubleshooting
Yellowing Leaves: Causes and Solutions
Seeing yellowing leaves on my ginger plants has always been a cause for concern. It’s one of those signs that something might be amiss. In my experience, yellow leaves can indicate a few different issues. One common cause is overwatering. I’ve had my fair share of soggy soil, which can lead to root problems and nutrient deficiencies. If I notice yellowing, I first check the soil moisture. If it’s too wet, I let it dry out a bit before watering again.
Another reason for yellow leaves could be a lack of nutrients. Ginger loves a balanced nutrient supply. When I’ve seen yellowing in my plants, I often opt to give them a gentle boost with some organic fertilizer. This usually helps restore their vibrant green color. Lastly, sometimes pests can cause yellowing. I keep a close eye on my plants for any signs of insects that might be affecting their health.
Root Rot Prevention and Treatment
Root rot is something I’ve dreaded ever since I lost a batch of ginger to it early on. The key to preventing root rot is ensuring that your ginger has well-draining soil. I’ve invested in pots with good drainage and have learned to avoid overwatering. If you’re growing ginger in the ground, make sure the planting area doesn’t retain too much water after heavy rain.
If you suspect that your ginger has root rot, it’s important to act quickly. I’ve found that lifting the plant gently to inspect the roots can tell me a lot. Healthy roots should be firm and white, while rotten roots will be brown and mushy. If I find any affected roots, I cut them away with a clean knife and repot the ginger in fresh, dry soil. This helps give the plant a fighting chance to recover.
Dealing with Pests: Common Ginger Pests
Pests can really be a headache, can’t they? I’ve encountered aphids and spider mites on my ginger plants, and it’s not a pleasant experience. One thing I’ve learned is that keeping the plants healthy and strong reduces the likelihood of pest infestations. I’ve found that regularly checking the undersides of leaves can help me spot any pesky critters before they take over.
If I see aphids, I usually give my plants a gentle spray with a mixture of water and mild soap. This often does the trick without harming the plants. For spider mites, I’ve had success using neem oil as a natural remedy. I apply it in the early morning or late afternoon to avoid leaf scorch. Staying vigilant and treating any signs of pests early has saved many of my ginger plants from significant damage.
Using Ginger in Your Kitchen
Cooking with Fresh Ginger
Now, let’s talk about one of my favorite aspects of growing ginger—using it in the kitchen! Fresh ginger adds such a lovely zing to dishes. I love grating it into stir-fries, soups, and marinades. The way it enhances flavors is incredible. I remember the first time I added fresh ginger to a homemade curry. It transformed the dish and left my family raving about the flavor!
Aside from savory dishes, I’ve also experimented with ginger in baking. Incorporating grated ginger into cookies or muffins gives them a delightful kick. I’ve even tried making ginger-infused syrups for drinks—there’s something refreshing about a ginger lemonade in the summer! The possibilities are endless, and I always feel a little extra proud knowing I grew the key ingredient myself.
Health Benefits of Ginger
Beyond its culinary uses, ginger is packed with health benefits that I personally appreciate. It’s known for its anti-inflammatory properties, which has come in handy for me when dealing with occasional digestive discomfort. I often brew fresh ginger tea when I’m feeling a bit under the weather. Just a few slices steeped in hot water can be so soothing!
Additionally, I’ve read that ginger can help with nausea and has potential benefits for reducing muscle pain. I keep a stash of ginger on hand for those days when I need a little boost. Knowing that I can grow this powerful herb in my own backyard makes it feel even more valuable to me.
Ginger Tea and Other Popular Recipes
One of my go-to recipes is ginger tea, which is incredibly easy to make. I simply slice a few pieces of fresh ginger and boil them in water for about 10 minutes. Sometimes I add a bit of honey and lemon for extra flavor. It’s a comforting drink, especially on chilly evenings. I’ve also enjoyed experimenting with ginger in smoothies. Adding a small chunk of fresh ginger really brightens the flavor and gives the smoothie an energizing kick.
Another recipe I love is ginger-infused rice. Cooking rice with a few slices of ginger gives it a subtle flavor that pairs beautifully with many dishes. I remember serving this to friends, and they were surprised at how much the ginger elevated the meal! Plus, it’s such a simple way to incorporate more fresh ginger into our diet.
Frequently Asked Questions
What is ginger and what part of the plant is used in cooking?
Ginger, scientifically known as Zingiber officinale, is a flowering plant native to Southeast Asia. The part of the plant we often use in cooking and for medicinal purposes is its rhizome, which has a unique flavor and aroma that enhances various dishes.
What are the benefits of growing ginger at home?
Growing ginger at home provides a fresh supply of this versatile spice, which often tastes richer than store-bought options. Additionally, ginger is known for its health benefits, including aiding digestion, reducing nausea, and possessing anti-inflammatory properties.
What are some common varieties of ginger?
Common varieties of ginger include Common Ginger, Turmeric, Galangal, and Yellow Ginger. Each variety has its own flavor profile and can be chosen based on culinary preferences.
How do I choose the right ginger root for planting?
When selecting ginger root, look for fresh, plump rhizomes with visible “eyes,” which indicate where new growth will emerge. Organic ginger is preferred as it is less likely to have been treated with chemicals that can hinder growth.
What are the optimal growing conditions for ginger plants?
Ginger thrives in well-draining, loamy soil rich in organic matter, with a pH between 6.0 and 6.5. It prefers warm, humid climates, typically between 70°F and 85°F, and can be grown in partial shade to full sun.
When is the best time to plant ginger?
The best time to plant ginger rhizomes is in the spring, after the last frost has passed, allowing the plants a full growing season to establish themselves.
How should I care for my ginger plants regarding watering?
Ginger plants love moisture but can be sensitive to overwatering. Water deeply once a week, checking the soil moisture first. During hotter months, you may need to water more frequently, ensuring the soil remains consistently moist but not soggy.
When is ginger ready for harvest?
Ginger is usually ready for harvesting about 8 to 10 months after planting, indicated by yellowing and dying back of the leaves. Patience is key to developing robust flavor.
What should I do if I notice yellowing leaves on my ginger plants?
Yellowing leaves may indicate overwatering, lack of nutrients, or pest issues. Check the soil moisture, consider fertilizing, and inspect for pests to address the problem.
How can I use fresh ginger in cooking?
Fresh ginger adds flavor to various dishes, including stir-fries, soups, marinades, and baked goods. It can also be used to make ginger tea, smoothies, and infused rice, enhancing the overall flavor profile of meals.