
Milkweed seed balls are effective tools for creating habitats for Monarch butterflies. This guide provides comprehensive instructions on how to make seed balls, their ecological benefits, and tips for successful planting.
Table of Contents
Understanding Milkweed Seed Balls
Milkweed seed balls are a fun and effective way to help create habitats for Monarch butterflies. These little bundles of hope are packed with milkweed seeds and nutrients, making it easy to promote butterfly populations in your area.
What are Milkweed Seed Balls?
Milkweed seed balls are small, round clusters made from a mix of milkweed seeds, clay, and compost. The clay helps hold everything together, while the compost provides essential nutrients for the seeds. When tossed onto the ground, these seed balls break down, allowing the seeds to germinate and grow into healthy milkweed plants.
The Importance of Milkweed for Monarchs
Milkweed is crucial for Monarch butterflies. It serves as the only food source for their larvae. Without milkweed, Monarchs can’t thrive. Here are a few key points about milkweed’s role:
- Nourishment: Monarch caterpillars feed exclusively on milkweed, growing strong and preparing for their transformation.
- Habitat Creation: Planting milkweed helps restore natural habitats where Monarchs can lay their eggs and find food.
- Pollinator Support: Milkweed attracts various pollinators, enhancing biodiversity in your garden.
Tips for Using Milkweed Seed Balls
To ensure your milkweed seed balls are successful, keep these tips in mind:
- Choose the Right Location: Look for sunny spots with well-drained soil. Monarchs love sunny areas.
- Time Your Planting: Late fall is ideal for planting milkweed seed balls. This allows for natural cold stratification, which helps seeds germinate in spring.
- Monitor Growth: Once planted, keep an eye on the area. Milkweed is resilient, but you may need to clear some weeds to give them a fighting chance.
Real-World Success Stories
Many gardeners have successfully used milkweed seed balls to create habitats for Monarchs. For example, a community garden in Ohio saw a significant increase in Monarch sightings after they scattered seed balls around their flowerbeds. This simple act not only beautified the area but also fostered a thriving butterfly population.
If you’re eager to get started, consider a Milkweed Seed Bomb Making Kit. It’s an easy way to gather all the materials you need. Check Price on Amazon and join the movement to support these beautiful creatures!
Step-by-Step Guide to Making Milkweed Seed Balls
Creating milkweed seed balls is a fun and rewarding way to support Monarch butterflies. These little orbs not only help spread milkweed seeds but also make planting easier and more effective. Let’s get started!
Gathering Your Ingredients
You’ll need a few simple materials to whip up your milkweed seed balls. Here’s a checklist:
- Milkweed seeds: Make sure they’re fresh and high-quality.
- Clay: Natural clay works best for binding everything together.
- Compost: This adds nutrients for the seeds.
- Water: Just enough to help mix everything.
- A mixing bowl: To combine all your ingredients.
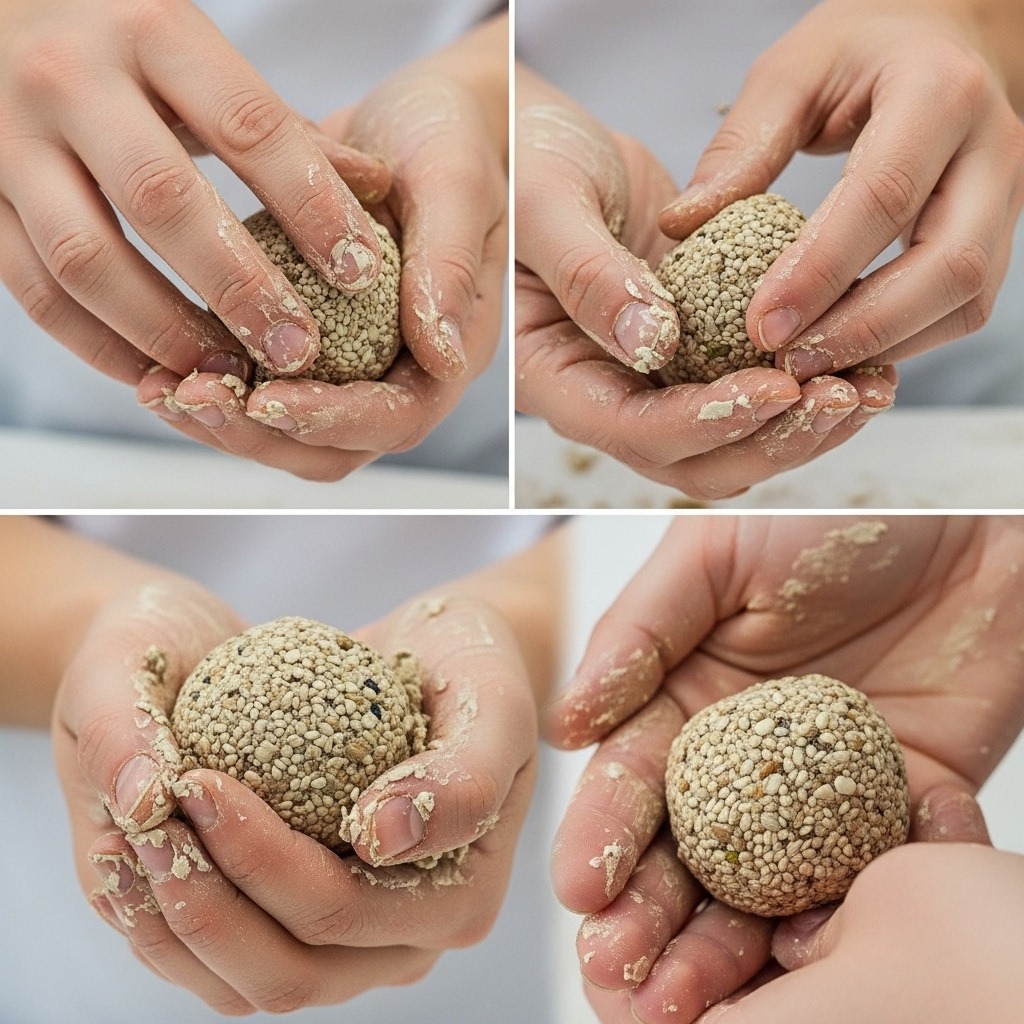
Mixing and Shaping the Seed Balls
Now that you have your ingredients, it’s time to mix and shape. Follow these steps:
1. Combine the dry ingredients: In your bowl, mix equal parts clay and compost. A good starting ratio is 1 cup of each.
2. Add the seeds: Sprinkle in about 10-15 milkweed seeds per ball. This ensures a nice spread.
3. Mix it up: Gradually add water while stirring until the mixture is damp but not soggy. You want it to hold together.
4. Shape the balls: Take a small handful of the mixture and roll it into a ball about the size of a marble. Make sure it’s compact.
5. Repeat: Continue until you’ve made as many seed balls as you need.
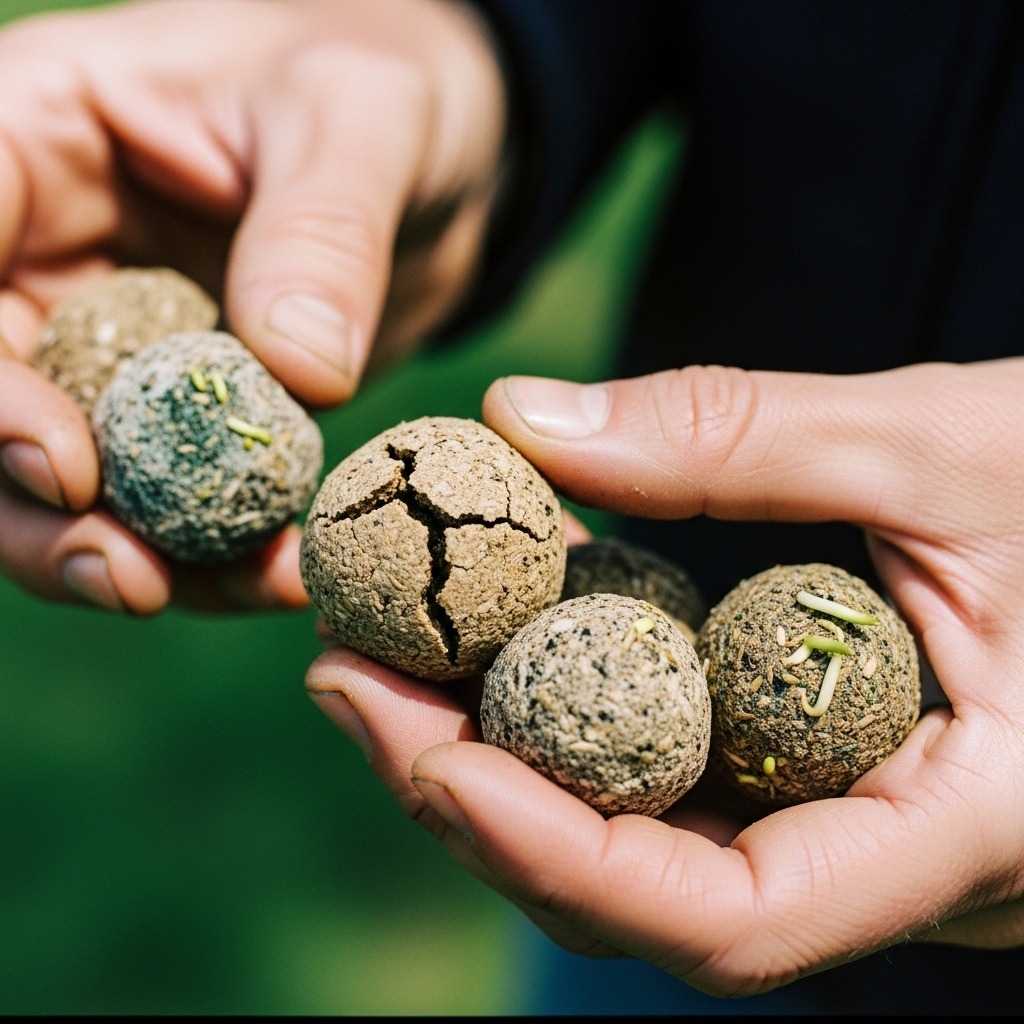
Drying and Storing Your Seed Balls
Once your seed balls are shaped, it’s time to dry them. Here’s how:
1. Lay them out: Place your seed balls on a tray or cardboard in a cool, dry area.
2. Let them dry: Allow them to dry for 24-48 hours. They should harden up nicely.
3. Store them: Once dry, keep your seed balls in a paper bag or cardboard box. Avoid plastic, as it can trap moisture.
Tip: If you want to use them later, store them in a cool, dark place. They can stay viable for several months.
Making milkweed seed balls is a simple process that can make a big difference for Monarchs. Plus, it’s a great project to involve family or friends. So gather your ingredients and get crafting!
Best Practices for Planting Milkweed Seed Balls
Planting milkweed seed balls is an exciting way to help Monarch butterflies thrive. Timing and location are key for success. Let’s dive into the best practices for planting these little green gems.
When to Plant Milkweed Seed Balls
Timing can make a big difference. Here’s what you need to know:
- Spring Planting: Aim for early spring when the soil starts to warm. This is great for areas where winters are mild.
- Fall Planting: Late fall is perfect for colder climates. The seed balls will experience natural cold stratification through winter and sprout in spring.
- Regional Calendar:
- Cool Climates: Plant in late April to early May.
- Moderate Climates: Plant in May for spring or October for fall.
- Warm Climates: Plant from late March to early April.
Choosing the Right Location
Location is crucial for the health of your milkweed. Here’s how to pick the best spot:
- Sunlight: Choose a sunny area with at least 6-8 hours of direct sunlight daily.
- Soil Type: Well-drained soil is essential. Milkweed doesn’t like soggy roots.
- Existing Vegetation: Clear away tall grass or weeds. This helps the seed balls establish without competition.
How to Care for Milkweed After Planting
Once you’ve planted your seed balls, follow these care tips:
- Watering: Water the area lightly after planting. Keep the soil moist but not waterlogged.
- Monitoring Growth: Check for sprouting in 2-3 weeks. If you see seedlings, that’s a good sign!
- Weed Control: Keep the area free of weeds as the plants grow. They can choke out your milkweed.
Using a Milkweed Seed Bomb Making Kit can simplify the process if you prefer a ready-made solution. Check Price on Amazon.
Remember, patience is key. Growing milkweed takes time, but the reward of helping Monarch butterflies is worth it!
Common Mistakes and Issues with Seed Balls
Making and using milkweed seed balls can be a fantastic way to support Monarch butterflies. However, there are some common mistakes and challenges that can trip up even the most enthusiastic gardeners. Let’s look at how to avoid these pitfalls.
Mistakes to Avoid When Making Seed Balls
1. Incorrect Ratios: Using too much clay or compost can make your seed balls too heavy. Aim for a mix of 1 part seeds, 3 parts compost, and 5 parts clay. This balance helps with germination.
2. Drying Too Long: If seed balls dry out completely, the seeds may not sprout. After making them, let them dry for no more than 24 hours. Keep them in a shady spot to prevent overheating.
3. Skipping Cold Stratification: Some milkweed seeds need a cold period to germinate. If you’re using seeds that require this, consider refrigerating them for about 30 days before making your seed balls.
4. Ignoring Soil Conditions: Not all soils are created equal! Make sure to check if the soil where you plan to plant is well-draining. Heavy clay can suffocate young roots.
Common Challenges in Planting Milkweed Seed Balls
1. Timing: Planting at the wrong time can hinder growth. Spring is ideal, but if you’re planting in fall, ensure the seeds are cold-stratified first.
2. Overcrowding: If many seed balls sprout in one area, the plants may compete for nutrients. Space them out or thin them as they grow.
3. Watering Issues: Too much or too little water can kill young seedlings. Water lightly to keep the soil moist but not soggy. Aim for consistency, especially in the first few weeks.
4. Pests and Weeds: Keep an eye out for pests that might munch on your seedlings. Weeds can also strangle young plants. Regularly check and clear the area.
5. Legal Considerations: Some areas have regulations about seed bombing. Make sure to check local laws before getting started. It’s crucial to protect both your efforts and the environment.
By avoiding these common mistakes and challenges, you’ll be on your way to creating a thriving habitat for Monarch butterflies with your milkweed seed balls!
Alternatives to Milkweed Seed Balls
While milkweed seed balls are a fun and effective way to plant, there are other methods to consider. Here’s a look at some alternatives for planting milkweed that can also help support our beloved Monarch butterflies.
Direct Sowing vs. Seed Balls
Direct sowing is the process of planting seeds directly into the soil. It’s simple and can be quite effective. Here’s how it stacks up against seed balls:
| Method | Pros | Cons |
|---|---|---|
| Seed Balls | – Easy to make and use | – Requires light for germination |
| – Protects seeds from pests | – Can be less effective in dense vegetation | |
| – Fun for group activities | – Needs moisture to break down | |
| Direct Sowing | – Seeds can germinate right in the soil | – More labor-intensive |
| – Better control over seed spacing | – More vulnerable to pests | |
| – Can be planted in specific conditions | – Requires careful soil prep and maintenance |
Using Transplants for Milkweed
Transplanting young milkweed plants is another method that can yield quick results. This involves growing milkweed in pots and moving them to your garden later. Here’s what to keep in mind:
- Faster Growth: Transplants can establish quickly, providing immediate habitat for Monarchs.
- Control Over Environment: You can monitor their growth in pots before planting them outside.
- More Care Needed: Transplants require regular watering and care until they’re settled in.
Transplanting can be especially useful if you’re working in areas where conditions may not be ideal for seeds, like compacted soil or heavy weeds.
Environmental Impact of Seed Bombing
Seed bombing is a creative way to spread seeds, but it’s not without its challenges. Here’s a quick rundown of the environmental impact:
- Pros:
- Engages the community in conservation efforts.
- Can revive neglected areas quickly.
- Cons:
- Risks of planting in non-native areas.
- Potential for overcrowding with too many seeds.
Each method has its strengths and weaknesses. Pick the one that suits your garden’s needs best!
Frequently Asked Questions
These quick answers cover the most common questions about this topic, including key details, practical tips, and common concerns.
How to plant milkweed seed balls?
Plantting milkweed seed balls is simple. Scatter them on well-drained soil in a sunny location during the appropriate season—preferably in fall or spring. Lightly press them into the soil surface to ensure contact. In colder climates, planting in fall allows natural cold stratification, which improves germination. Water the area lightly after planting to keep the soil moist. Patience is key; seedlings typically emerge in a few weeks.
Should I cut off the milkweed seed pods?
No, you generally do not need to cut off milkweed seed pods when making seed balls. For natural planting, allow the pods to mature and dry on the plant, then collect the seeds. However, if you’re making seed balls, you will incorporate the seeds into the mixture before forming the balls. When planting directly, harvesting mature pods ensures you get viable seeds for your seed balls or direct sowing.
Why is seed bombing illegal?
Seed bombing may be illegal in some areas because it can lead to unintentional planting of invasive species or non-native plants. It also risks planting seeds in protected or restricted areas, which could disturb local ecosystems. Always check local regulations before seed bombing. Responsible planting involves choosing native, approved species and planting in designated areas.
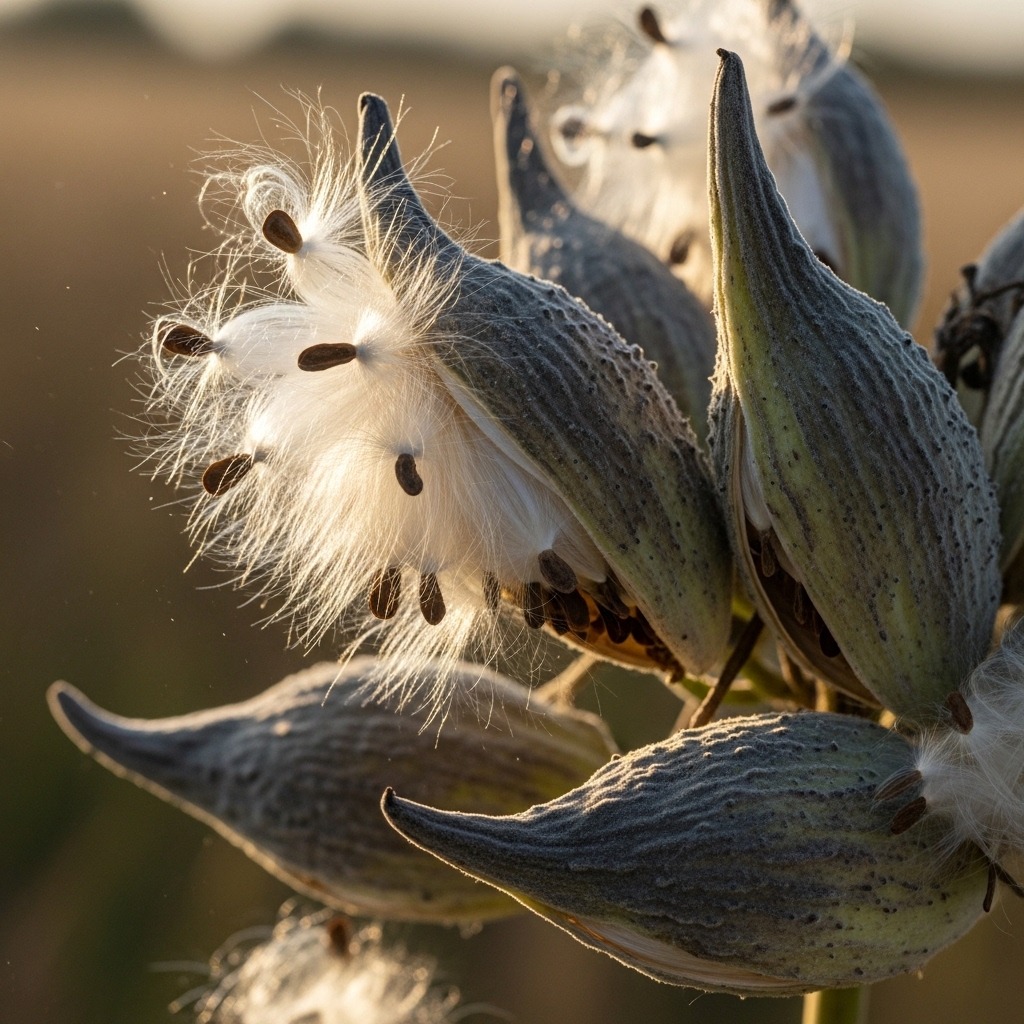
Should I call milkweed hairy balls?
Some people colloquially refer to milkweed seed pods or seed balls as “hairy balls” because of the silky hairs attached to the seeds. These hairs help the seeds disperse by wind. While not a formal term, “hairy balls” can describe the appearance of mature seed pods or seeds with their fluffy appendages.
What are the best practices for storing milkweed seed balls?
Store dry, hardened milkweed seed balls in a paper bag or cardboard box in a cool, dark, and dry place. Avoid plastic containers, which can trap moisture and cause mold. Proper storage preserves seed viability for several months. When ready to plant, you can use the seed balls directly or soak them to encourage germination.
Can I use any type of milkweed for seed balls?
Not all milkweed species are suitable for seed balls. Native milkweed species like common milkweed (Asclepias syriaca), butterfly weed (Asclepias tuberosa), and swamp milkweed (Asclepias incarnata) are ideal choices. Select species that are native to your region to ensure they thrive and support local pollinators without risking invasiveness.
What time of year is best for planting milkweed seed balls?
The optimal time is during late fall or early spring. Fall planting allows seeds to undergo natural cold stratification, improving germination. Spring planting is also effective once the soil warms. Avoid planting in midsummer or winter, as extreme conditions can hinder seedling growth.
How do I care for my milkweed plants after planting?
After planting, keep the area moist but not waterlogged. Water regularly during dry spells. Remove competing weeds to reduce competition. Once established, milkweed is low-maintenance and drought-tolerant. Avoid excessive fertilization, as milkweed prefers lean soils. Watch for pests like aphids and handle them promptly to protect your plants.