
The key to planting carrots for a perfect harvest lies in understanding their variety, soil requirements, and proper planting techniques. With a little knowledge and care, you can enjoy a bountiful carrot harvest straight from your garden. Read Interesting article: Can You Plant Spinach With Carrots?
Understanding Carrots: Types and Varieties
When I first started gardening, I was amazed by the variety of carrots available. I had no idea that there were so many different types! Each variety has its own unique flavor, texture, and growth characteristics, which can significantly affect your harvest.
Common Carrot Varieties (Nantes, Danvers, Imperator)
Let’s dive a little deeper into some of the most common carrot varieties. The Nantes variety is known for its sweetness and smooth texture. They are short, cylindrical, and perfect for those of us who prefer a tender carrot. On the other hand, Danvers carrots are a bit longer and have a robust flavor, making them great for cooking. Then there’s the Imperator variety, which is long and tapered, often found in grocery stores. I’ve found that trying different varieties helps me discover new flavors and textures that I love. Read Interesting article: How to Plant Cucumbers for Fast Growth & High Yield
Choosing the Right Carrot for Your Climate
One of the most important lessons I learned is that not all carrots grow well in every climate. For example, if you live in a cooler region, you might want to stick to varieties like Nantes or Amsterdam, which can handle the chill better than some others. Conversely, if you’re in a warmer climate, you can opt for varieties like Imperator that thrive in the heat. It’s all about matching the carrot type to your local conditions. I often check with local gardeners or gardening groups to see what varieties they recommend for my area.
Preparation: Soil and Location
The foundation of a successful carrot harvest starts with the soil and location. I can’t stress enough how crucial this step is! Healthy soil sets the stage for strong, vibrant growth.
Selecting the Ideal Soil Type (Loamy, Sandy, Clay)
Carrots thrive best in loose, well-drained soil. I’ve experimented with different types, and I found that loamy soil is ideal because it retains moisture while allowing good drainage. Sandy soil is also excellent, as it prevents the carrots from becoming stunted and misshapen. I’ve tried planting in clay soil too, but it can be a challenge; the carrots tend to grow crooked. If clay is your only option, I recommend amending it with organic matter to improve drainage and texture.
Soil pH and Nutrient Requirements
Another aspect I learned about is soil pH. Carrots prefer a pH level between 6.0 and 6.8. I remember testing my soil with a simple kit, which helped me determine if I needed to add lime or sulfur to adjust the pH. Besides pH, carrots benefit from nutrients like potassium and phosphorus. Incorporating well-rotted compost or a balanced fertilizer before planting can work wonders. I usually mix in compost a few weeks before planting to ensure everything is well-integrated.
Choosing the Right Location (Sunlight and Drainage)
Location is key when planting carrots. They need full sun, so I always choose a spot in my garden that receives at least six hours of sunlight daily. Shady areas just won’t cut it for these sun-loving roots. Additionally, good drainage is vital. I’ve learned the hard way that planting in a low-lying area can lead to waterlogged soil, which is detrimental to carrots. If you have a sloped yard, consider planting in raised beds to improve drainage. This has worked wonders for my garden!
When to Plant Carrots
Timing is everything in gardening, and planting carrots is no exception. I’ve had my share of mishaps when it comes to timing, so I’ve learned to pay close attention to the seasons.
Understanding Carrot Growing Seasons
Carrots are typically cool-season crops, which means they can be planted in both spring and fall. In spring, I like to sow my seeds as soon as the soil can be worked, usually around two to three weeks before the last frost. For a fall harvest, I aim to plant about 10 to 12 weeks before the first expected frost. This way, I can enjoy fresh carrots well into the cooler months. I’ve really enjoyed the taste of fall-harvested carrots; they seem sweeter after the first frost.
Optimal Planting Times for Different Regions
Now, depending on where you live, the optimal planting times can vary. For example, in warmer climates, you may find that you can start planting as early as January, while in colder regions, it might be late April or even May. I keep a gardening calendar to help remind me of these times, and I often check with local extension services for the best planting dates specific to my area. It’s all about knowing your local climate and making adjustments accordingly.
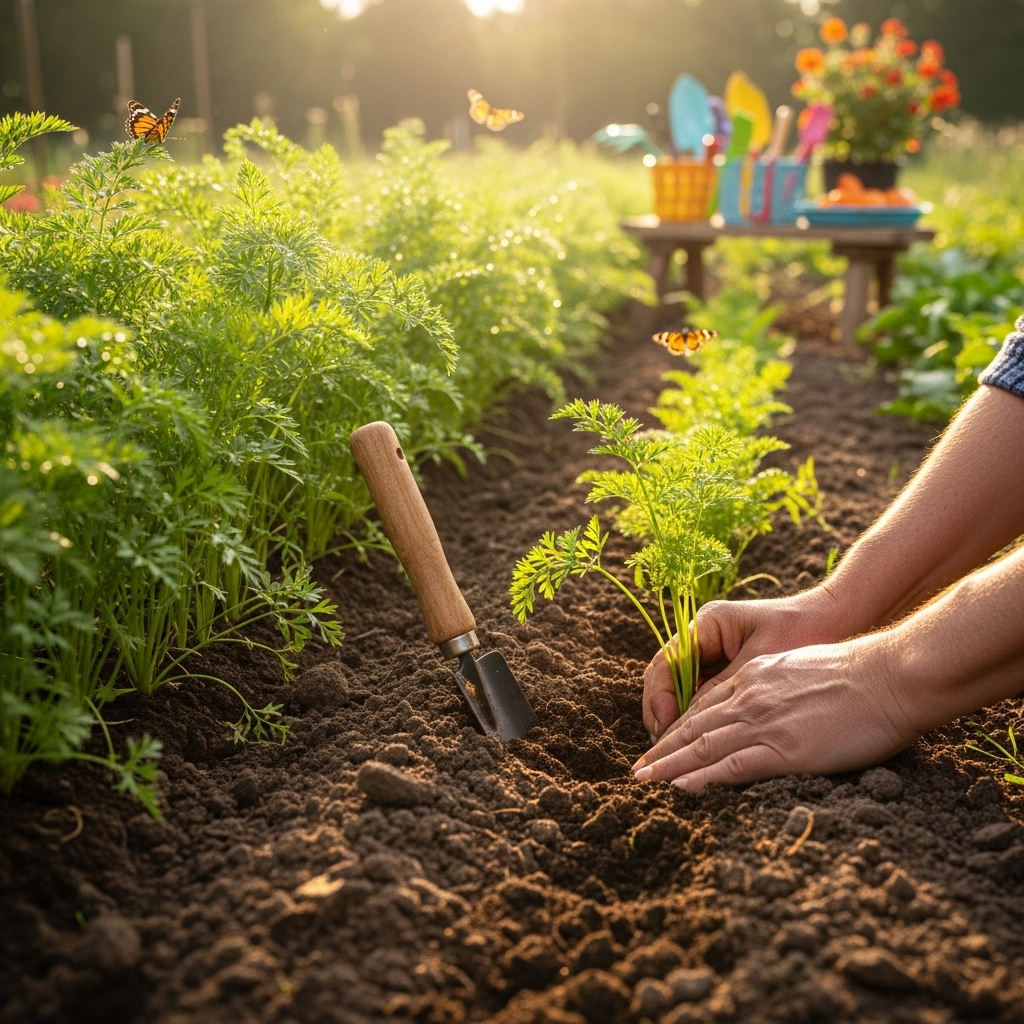
How to Plant Carrots
Now that we’ve covered when to plant carrots, let’s get into the nitty-gritty of how to actually plant them. I remember the first time I planted carrots; I was so excited but a little nervous too. I wanted everything to go perfectly, but I quickly learned that there are some essential steps to make the planting process successful.
Seed Preparation and Selection
Choosing the right seeds is crucial. I always start by looking for seeds that are specifically labeled for the variety I want to grow, whether it’s Nantes, Danvers, or another type. I’ve found that buying seeds from reputable suppliers ensures better germination rates and healthier plants. Before planting, I sometimes soak the seeds in water for a few hours. This helps to soften the seed coat and can speed up germination. I’ve noticed that soaking can make a big difference, especially with the smaller seed varieties.
Another tip I’ve learned is to mix carrot seeds with some sand. This technique helps to space out the seeds better when I’m planting. The last thing I want is to end up with a bunch of crowded carrots! A little trick I picked up from a gardening friend is to use a seed tape, which can make planting even easier. I love how it saves time and ensures even spacing, plus it reduces the risk of over-sowing.
Planting Techniques (Direct Sowing vs. Transplants)
Carrots are typically direct-sown, which means I plant the seeds directly into the soil instead of starting them indoors. I’ve tried transplanting carrots, but they really don’t like it. They need their space to grow, and moving them can disrupt their delicate roots. I learned this the hard way when I tried to move some seedlings; they just didn’t thrive.
When I’m ready to plant, I prepare the garden bed by loosening the top few inches of soil. I make shallow furrows about ¼ to ½ inch deep and then sprinkle the seeds along the row. I’ve found that it’s important not to plant them too deep, as they need light to germinate. After sowing the seeds, I gently cover them with soil and lightly pat it down. I try to keep the soil moist during this phase, as it’s vital for germination.
Spacing and Depth Guidelines
One of the biggest lessons I learned is to pay attention to spacing. Carrots need room to grow, so I make sure to space the seeds about 2 to 4 inches apart. This allows the roots to develop without competing for space. I usually thin them out once they’ve sprouted to give each carrot enough room to grow. It’s tough to pull out those little seedlings, but I remind myself that thinning is essential for a successful harvest.
Maintaining the right depth is also important. I aim for a planting depth of about a quarter to half an inch. If I plant them too deep, they might struggle to break through the soil, which I’ve experienced before. I’ve learned to be patient during this time; germination can take anywhere from 10 to 20 days, depending on the variety and environmental conditions. I try not to disturb the soil too much during this waiting period, as it can encourage air pockets that hinder growth.
Watering and Care for Carrots
Once my seeds are in the ground, the next step is taking care of them. I’ve found that proper watering is crucial for healthy carrot growth. It’s a delicate balance; I want to keep the soil consistently moist without drowning the seeds.
Watering Requirements for Optimal Growth
I typically water my carrot beds regularly, especially during dry spells. I aim for about an inch of water per week, whether from rain or irrigation. I prefer using a soaker hose or drip irrigation because it delivers water directly to the soil, minimizing evaporation and keeping the foliage dry. This method has worked wonders for me and helps reduce the risk of diseases. I’ve noticed that if I allow the soil to dry out too much, the carrots can become tough and woody.
Fertilization Tips (Organic vs. Chemical)
Fertilizing is another critical aspect of carrot care. I usually opt for organic options like compost or well-rotted manure. I incorporate these into the soil before planting, as I’ve found that they provide a slow-release source of nutrients. If my carrots look like they need a boost later on, I might apply a diluted liquid fertilizer that is low in nitrogen, since too much nitrogen can lead to excessive foliage growth at the expense of root development. Read Interesting article: Are Coffee Grounds Good for Plants? Pros Cons & Best Uses
Weed Control and Mulching Techniques
Weeds can be a real headache when it comes to growing carrots. I’ve had my share of battles with them! To keep weeds at bay, I apply a layer of organic mulch around my carrot rows. This not only suppresses weeds but also helps retain moisture in the soil. I’ve found that straw, grass clippings, or shredded leaves work well as mulch. Just be careful not to pile it too high around the carrot tops, or they might start to rot.
Keeping an eye on my carrot beds and addressing any weed issues early has made a significant difference in the health of my plants. I’ve learned that a little vigilance goes a long way towards ensuring a thriving carrot crop!
Pest and Disease Management
As I continued my journey in growing carrots, I soon discovered that it wasn’t just about the soil, sun, and water. Pests and diseases can sneak in and ruin all your hard work if you’re not vigilant. It’s a lesson I learned early on when I noticed some of my carrot tops wilting and the roots not developing as they should. Here’s what I’ve learned about managing pests and diseases in my carrot patch.
Common Pests (Carrot Flies, Aphids)
One of the biggest threats I faced was the carrot fly. These pests are sneaky; they lay their eggs near the base of the plant, and when the larvae hatch, they burrow into the roots, causing damage. I remember the first time I discovered them—I was devastated! After some research, I learned that one of the best ways to prevent carrot flies is by using row covers. These lightweight fabrics protect the plants while allowing sunlight and moisture to reach them. I’ve used them successfully to keep those pesky flies at bay.
Aphids are another common pest that I’ve encountered. They can show up in clusters, sucking the sap from the leaves and causing stunted growth. In my experience, a strong blast of water can often dislodge them, but if the infestation is severe, I’ve turned to insecticidal soap or neem oil. It’s a more natural approach that doesn’t harm beneficial insects as much. I try to keep an eye out for any signs of aphids, especially in the warmer months.
Preventing and Treating Diseases (Fungal and Bacterial)
Diseases can be just as tricky to deal with as pests. Fungal diseases, like downy mildew, can wreak havoc on my carrots if I’m not careful. I learned that proper spacing between plants can improve air circulation, which helps prevent these kinds of diseases. I always make sure my carrot beds are well-drained to avoid any water pooling, as damp conditions promote fungal growth. If I see any signs of mildew, I’ve had success with organic fungicides, which can help control the spread without harming the plants.
Bacterial diseases are also a concern. Bacterial blight can cause dark spots on the leaves, leading to a decline in plant health. I’ve found that practicing crop rotation has been beneficial in preventing this disease. By not planting carrots in the same spot year after year, I reduce the chances of carrying diseases over from one season to the next. Additionally, I make sure to keep my gardening tools clean to avoid transferring pathogens from one plant to another.
Harvesting Carrots
After all the hard work of planting, caring for, and protecting my carrots, it’s finally time to harvest! I remember the excitement I felt during my first harvest. But I also learned that knowing when and how to harvest is just as important as the planting process.
Signs of Maturity and When to Harvest
One of the best parts of growing carrots is seeing how they grow and develop. I’ve learned to look for certain signs to know when they’re ready to be pulled from the ground. Typically, carrots are ready to harvest when they reach about an inch in diameter for smaller varieties and two inches for larger ones. The foliage also gives clues; when the tops start to look lush and vibrant, it’s often a good indicator that the roots beneath are maturing nicely.
I also keep an eye on the calendar; while it’s crucial to look at the size of the carrots, I’ve found that most varieties take about 70 to 80 days to reach maturity. It’s always a good idea to check the seed packet for specific timing. The first time I harvested, I was too eager and pulled them too early, leading to smaller, less flavorful roots. Now, I’ve learned to be patient!
Harvesting Techniques for Maximum Yield
When it comes to harvesting, I’ve discovered a few techniques to ensure I get the most out of my carrot crop. I gently loosen the soil around the carrot with a garden fork to make pulling them out easier. I’m careful not to damage the roots while doing this, as I’ve lost a few carrots in the past by being too rough. Once I feel the soil loosen up, I grab the carrot tops and pull them straight out, giving a little twist if needed.
I always harvest in the cooler parts of the day, either early morning or late afternoon. This helps keep the carrots crisp and fresh. After pulling them up, I rinse off the dirt and lay them out to dry briefly. I’ve found that allowing them to dry helps prevent rot during storage. Once they’re clean and dry, I store them in the fridge or in a cool, dark place, ensuring I can enjoy the fruits of my labor for weeks to come.
Frequently Asked Questions
What are some common varieties of carrots?
The most common carrot varieties include Nantes, Danvers, and Imperator. Nantes carrots are known for their sweetness and smooth texture, Danvers have a robust flavor and are great for cooking, while Imperator carrots are long and tapered, often found in grocery stores.
What soil type is best for growing carrots?
Carrots thrive best in loose, well-drained soil. Loamy soil is ideal as it retains moisture while allowing good drainage. Sandy soil is also suitable, while clay soil can be challenging unless amended with organic matter.
What pH level do carrots prefer?
Carrots prefer a soil pH level between 6.0 and 6.8. Testing the soil with a kit can help determine if lime or sulfur is needed to adjust the pH.
When is the best time to plant carrots?
Carrots can be planted in both spring and fall. In spring, seeds are sown about two to three weeks before the last frost, and for a fall harvest, planting should occur about 10 to 12 weeks before the first expected frost.
How should I space carrot seeds when planting?
Carrot seeds should be spaced about 2 to 4 inches apart to allow the roots to develop without competing for space. Thinning them out once they’ve sprouted is also important for a successful harvest.
What is the recommended watering technique for carrots?
Carrots require about an inch of water per week, whether from rain or irrigation. Using a soaker hose or drip irrigation is preferred as it delivers water directly to the soil while minimizing evaporation.
How can I control weeds while growing carrots?
Applying a layer of organic mulch around carrot rows can suppress weeds and help retain moisture in the soil. Options like straw, grass clippings, or shredded leaves work well, but care should be taken not to pile it too high around the carrot tops.
What are common pests that affect carrots?
Common pests include carrot flies and aphids. Carrot flies lay eggs near the base of the plant, while aphids cluster on leaves, sucking sap and causing stunted growth.
How can I tell when my carrots are ready to harvest?
Carrots are typically ready to harvest when they reach about an inch in diameter for smaller varieties and two inches for larger ones. The foliage should look lush and vibrant, and most varieties take about 70 to 80 days to mature.
What techniques should I use when harvesting carrots?
To harvest carrots, gently loosen the soil around them with a garden fork to make pulling easier. Harvest during cooler parts of the day, rinse off the dirt, and allow them to dry before storing in the fridge or a cool, dark place.