
To plant peppers for maximum harvest, choose the right variety for your climate, prepare your soil well, and ensure proper care throughout the growing season. I’ve found that a little planning makes a big difference in the quantity and quality of the peppers you can enjoy.
Table of Contents
Understanding Pepper Varieties
Choosing the right pepper variety is the first step toward a bountiful harvest. There are many types of peppers, each with unique flavors, heat levels, and growing requirements. Personally, I love experimenting with different kinds in my garden, and I’ve learned that understanding each variety can lead to better decisions about what to plant.
Sweet Peppers: Bell and Banana Peppers
Sweet peppers, such as bell and banana peppers, are perfect for those who prefer milder flavors. Bell peppers, with their vibrant colors and crunchy texture, are great for salads, stir-fries, and grilling. I remember my first experience with homegrown bell peppers; they were so much sweeter than the store-bought ones! Banana peppers, on the other hand, are slightly tangy and are often used in sandwiches or pickled for a zesty kick. When choosing sweet peppers, consider your taste preferences and the dishes you enjoy making.
Hot Peppers: Jalapeños, Habaneros, and Others
If you’re a fan of heat, hot peppers like jalapeños and habaneros are a must. Jalapeños are versatile and can be used fresh, stuffed, or even smoked. I often use them in salsas and sauces for that extra kick. Habaneros are significantly hotter and bring a fruity flavor to dishes, perfect for those who love bold tastes. I’ve made some amazing hot sauces using my homegrown habaneros, and they always impress friends and family. When selecting hot peppers, think about how much heat you can handle and how you plan to use them in your cooking.
Choosing the Right Variety for Your Climate
Climate plays a crucial role in determining which pepper varieties will thrive. Some peppers, like bell peppers, prefer a milder climate, while others, such as habaneros, love the heat. I’ve learned that checking your local growing zone can help you make informed decisions about which peppers to grow. In cooler climates, starting seeds indoors can give you a head start, while warmer regions may allow for direct sowing in the garden. Make sure to research the best varieties suited for your area, as this can directly impact your harvest.
Preparing for Planting
Once you’ve selected your pepper varieties, the next step is preparation. This phase is crucial for setting the stage for a successful growing season. I’ve spent time preparing my garden beds, and I can confidently say that the effort pays off in the long run.
Choosing the Right Location
Location matters when it comes to planting peppers. Peppers thrive in full sun, so I always look for spots in my garden that receive at least 6-8 hours of sunlight a day. I remember moving my pepper plants to a sunnier area one year, and the difference in growth was remarkable. Additionally, consider wind protection; strong winds can damage young plants. I usually plant my peppers near a garden wall or fence, which provides some shelter without blocking the light.
Soil Requirements and Preparation
Soil quality is another critical factor. Peppers prefer well-draining soil rich in organic matter. In my experience, mixing in compost or well-rotted manure has done wonders for my plants. I usually aim for a soil texture that’s light and fluffy, which allows roots to grow deep and healthy. If your garden soil is heavy clay or sandy, consider amending it to improve drainage and nutrient retention. Testing your soil before planting can give you insights into what it may need. You might also want to explore Is Epsom Salt Good for Plants? Benefits & Risks for further soil improvement tips.
Understanding pH Levels and Soil Amendments
The pH level of your soil can affect how well your plants absorb nutrients. Peppers prefer a slightly acidic to neutral pH, typically between 6.0 and 7.0. I remember testing my soil a few years ago, and it was higher than I expected. After adding some sulfur, I noticed an improvement in my plants’ growth. If your soil is too acidic or alkaline, you can amend it with lime or sulfur, respectively, to bring it to the ideal level. It’s worth taking the time to get this right, as it can lead to healthier plants with more robust yields.
When to Plant Peppers
Timing is everything when it comes to planting. I’ve learned through trial and error that getting this part right can make or break your pepper harvest. I’ve found that being aware of the changing seasons and local climate is essential.
Ideal Planting Seasons
Peppers are warm-weather plants, so they’re best planted in late spring after the last frost. I typically wait until nighttime temperatures are consistently above 55°F (13°C). In my garden, I often plant in late May, which has worked well for me. If you live in a cooler area, you might want to start seeds indoors to give them a head start. This way, when the weather is finally warm enough, you’ll have strong seedlings ready to go into the ground.
Understanding Frost Dates and Temperature Requirements
Knowing your area’s frost dates is vital. I keep a calendar where I mark the last frost date each year, which helps me plan my planting schedule. Peppers are sensitive to cold, and even a light frost can damage or kill young plants. It’s a good idea to keep an eye on the weather forecast as you approach planting time, just to stay prepared. I’ve learned to have some row covers handy; they can protect my plants if an unexpected cold snap hits after I’ve planted.
Starting Peppers from Seeds
Seed Selection and Quality
When it comes to starting peppers from seeds, I’ve learned that the quality of the seeds you choose really matters. I usually look for seeds that are labeled as organic or heirloom, as these often produce healthier plants. I remember the first time I bought seeds from a local farmer’s market; the difference in germination rates and plant vigor was astounding compared to some of the commercial packets I’d used before. I recommend checking the seed packet for information about the variety’s growth habits and days to maturity, which can help you plan your gardening schedule. Additionally, sourcing seeds from reputable companies can ensure they’re fresh and viable, giving you the best chance for success.
Seed Germination Techniques
Now, germinating seeds can be a fun process, and I’ve tried a few methods over the years. One of my favorites is using seed trays with a seed-starting mix. I fill the trays with the mix, moisten it, and then place my seeds about a quarter-inch deep. I’ve found that covering the tray with a plastic dome helps maintain humidity, which is crucial for germination. Another technique I’ve enjoyed is using peat pots, which can be planted directly in the garden later. Once I see those little green sprouts, I’m always filled with excitement. Keeping the seeds warm is important, so I usually place them in a sunny spot or use a seed heating mat to give them that extra boost.
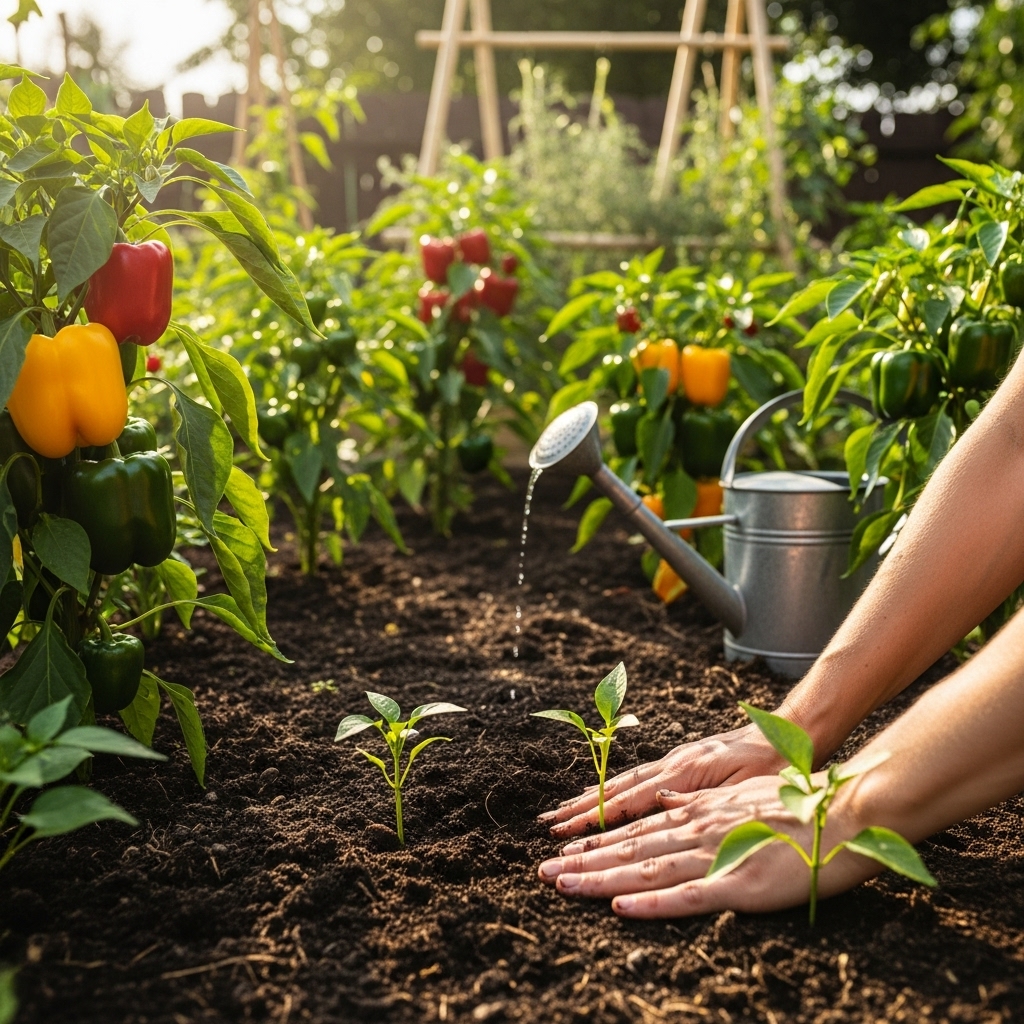
Transplanting Seedlings
Transplanting seedlings is a big moment, and I always approach it with care. Once my seedlings have developed a few sets of true leaves and the weather has warmed up, it’s time to move them outside. I make sure to harden them off first; this means gradually introducing them to outdoor conditions. I start by placing them outside for a few hours each day, slowly increasing the time until they’re ready for full days outside. When transplanting, I dig a hole that’s slightly larger than the root ball and gently place the seedling in, making sure the soil level is the same as it was in the tray. I’ve learned that being gentle with the roots helps avoid transplant shock, which can slow down growth.
Direct Sowing vs. Transplanting
Advantages of Direct Sowing
Direct sowing can be a fantastic option, especially if you’re looking for a more straightforward approach. I remember the first time I tried direct sowing; it felt freeing to skip the seed-starting indoors. This method allows me to plant seeds directly in the garden after the last frost date. One significant advantage is that it reduces the risk of transplant shock since the plants grow in their final location from the start. I’ve found that direct sowing works well for varieties that germinate quickly and thrive in my climate. Additionally, it saves time and resources, making it a great choice for gardeners looking for simplicity.
Benefits of Transplanting Seedlings
On the other hand, transplanting seedlings can provide a jumpstart to the growing season. I’ve seen firsthand how starting seeds indoors can lead to earlier harvests. By starting them indoors, I can ensure I have strong, well-established plants ready to go outside as soon as the weather permits. This method is particularly beneficial in cooler climates where the growing season is shorter. I’ve also noticed that transplants tend to be more resilient against pests and diseases, as I can monitor their growth closely during the early stages. It does require more effort initially, but in my experience, the rewards are definitely worth it.
Planting Techniques for Maximum Yield
Spacing and Layout for Optimal Growth
When I think about maximizing my pepper yield, spacing and layout come to mind immediately. I’ve tried different arrangements in my garden, and I’ve found that giving each plant enough room to breathe and grow is crucial. I usually space my pepper plants about 18 to 24 inches apart, depending on the variety. This spacing allows for adequate air circulation, which helps prevent diseases and encourages healthy development. Additionally, I’ve experimented with planting in rows and staggered layouts, and I’ve noticed that the staggered design allows for better sunlight exposure.
Companion Planting for Pest Control
Companion planting has been a game-changer for me in pest management. Some plants, like marigolds, naturally repel pests that are drawn to peppers, so I often plant them nearby. I’ve found that basil also works well with peppers, enhancing their flavor while keeping unwanted bugs away. The beauty of companion planting is that it creates a balanced ecosystem in the garden, and I’ve noticed healthier plants overall. It feels great knowing I’m using natural methods to protect my peppers while also enjoying the benefits of a diverse garden. I often refer to How to Use Neem Oil on Plants (Safe & Effective) for additional pest control methods.
Watering Techniques and Schedules
Watering is another crucial aspect of growing peppers successfully. I’ve learned that peppers prefer consistent moisture but don’t like sitting in water. I try to water them deeply once or twice a week, allowing the soil to dry out slightly between sessions. Drip irrigation has worked wonders for me, as it provides a steady supply of water directly to the roots without wetting the foliage. This method reduces the risk of disease and helps keep the soil temperature stable. I always check the soil moisture before watering, as overwatering can be just as detrimental as underwatering.
Care and Maintenance During the Growing Season
Fertilization and Nutrient Needs
Feeding my pepper plants is something I pay close attention to during the growing season. I typically start with a balanced fertilizer when I transplant my seedlings. As the plants grow, I switch to a fertilizer higher in potassium, which helps with flowering and fruiting. I remember the first time I forgot to fertilize, and my plants didn’t produce as many peppers as I had hoped. Now, I make it a point to follow a fertilization schedule and often use organic options like fish emulsion or compost tea. I believe that nourishing my plants helps ensure a bountiful harvest.
Pest and Disease Management
Pests can be a real challenge when growing peppers, and I’ve had my share of experiences dealing with them. I’ve found that keeping an eye on my plants regularly helps catch any issues early on. I often use insecticidal soap or neem oil as a natural remedy for pests like aphids and spider mites. Additionally, I’ve learned the importance of crop rotation and cleanliness in my garden to prevent diseases. Creating a healthy environment with good air circulation and avoiding overcrowding also contribute to keeping my plants disease-free.
Pruning Techniques for Better Harvest
Pruning is another technique I’ve embraced to enhance my pepper yields. I’ve discovered that removing some of the lower leaves can improve air circulation and redirect energy into fruit production. It might seem counterintuitive at first, but careful pruning can lead to healthier plants with more abundant harvests. I usually trim back any suckers or excess foliage that could hinder growth. This practice, combined with regular maintenance, has significantly improved my pepper production over the years.
Harvesting Peppers
When to Harvest: Signs of Ripeness
As the growing season progresses, the excitement of harvesting my peppers builds. I’ve learned to look for specific signs of ripeness. For sweet peppers, I wait until they reach their full color and size, while hot peppers can be harvested when they’re still green, but I prefer to wait until they develop their full color for the best flavor. I remember the first time I picked a pepper too early—it just didn’t have that rich, sweet taste I was hoping for. Now, I make sure to check the firmness and color before picking, ensuring I get the best flavor possible.
Best Practices for Harvesting to Maximize Yield
When it’s time to harvest, I handle my peppers with care to avoid damaging the plants. I use garden shears or scissors to cut the stems cleanly, which helps prevent any stress on the plant. I also try to harvest in the morning when temperatures are cooler, ensuring the peppers are crisp and full of moisture. By keeping track of how many peppers I harvest each time, I can gauge the health of my plants and make adjustments to my care accordingly. I’ve learned that regular harvesting encourages more fruiting, so I try to check my plants every few days as they come into full production.
Post-Harvest Handling and Storage
Cleaning and Storing Fresh Peppers
After a successful harvest, cleaning and storing my peppers properly is essential. I rinse them gently under cool water to remove any dirt or residues. Sometimes I use a soft brush to get into nooks and crannies. Once they’re clean, I pat them dry thoroughly—moisture can lead to mold during storage. I usually store my fresh peppers in the refrigerator, where they’ll last longer. I’ve learned that keeping them in a breathable bag helps maintain their crispness and flavor.
Preservation Methods: Canning, Freezing, and Drying
Not all my peppers get eaten right away, so I’ve explored various preservation methods. Canning has become a favorite of mine for creating delicious salsas and pickled peppers. I enjoy the whole process, from selecting spices to sealing jars. Freezing is another easy option; I simply slice and blanch my peppers before placing them in airtight bags. I’ve found that freezing maintains their flavor while making them convenient for future recipes. Lastly, drying peppers has been a fun way to create my own chili flakes or powders. I remember my first time drying jalapeños; the aroma filled the house, and the end result was so rewarding. You can also check out How to Plant Okra for Maximum Yield for more planting insights.
Frequently Asked Questions
What should I consider when choosing pepper varieties for planting?
When choosing pepper varieties, consider the unique flavors, heat levels, and growing requirements of each type. It’s also important to select varieties that are suited to your climate for a bountiful harvest.
What are some popular sweet pepper varieties?
Popular sweet pepper varieties include bell peppers and banana peppers. Bell peppers are known for their vibrant colors and crunchy texture, while banana peppers have a slightly tangy flavor and are often used in sandwiches or pickled.
How do I know which hot pepper varieties to choose?
If you enjoy heat, consider varieties like jalapeños and habaneros. Jalapeños are versatile and can be used fresh or cooked, while habaneros are significantly hotter and add a fruity flavor to dishes.
What is the best time to plant peppers?
Peppers are best planted in late spring after the last frost, typically when nighttime temperatures are consistently above 55°F (13°C). In cooler climates, starting seeds indoors can give you a head start.
How should I prepare my soil for planting peppers?
Peppers prefer well-draining soil rich in organic matter. Mixing in compost or well-rotted manure can improve soil quality. Additionally, testing the soil’s pH is important, as peppers thrive in a slightly acidic to neutral pH between 6.0 and 7.0.
What are the advantages of starting peppers from seeds indoors?
Starting peppers from seeds indoors allows for earlier harvests and ensures that the plants are strong and well-established before being moved outside. This method is particularly beneficial in cooler climates with shorter growing seasons.
How do I effectively water my pepper plants?
Peppers prefer consistent moisture but do not like sitting in water. Water them deeply once or twice a week, allowing the soil to dry out slightly between sessions. Using drip irrigation can provide a steady water supply directly to the roots.
What are some recommended fertilization practices for pepper plants?
Start with a balanced fertilizer when transplanting seedlings, then switch to a fertilizer higher in potassium as the plants grow to promote flowering and fruiting. Organic options like fish emulsion or compost tea are also beneficial.
When is the best time to harvest peppers?
For sweet peppers, wait until they reach their full color and size. Hot peppers can be harvested when they are still green, but waiting for full color tends to enhance their flavor.
What preservation methods can I use for peppers after harvesting?
After harvesting, peppers can be cleaned and stored in the refrigerator. For preservation, you can can them, freeze them after blanching, or dry them to create chili flakes or powders.