
Planting potatoes from eyes is a simple and rewarding process that allows you to grow your own potatoes from parts of the tuber. By following a few straightforward steps, you can turn your kitchen scraps into a bountiful harvest.
Understanding Potato Eyes
What Are Potato Eyes?
Potato eyes are small buds or indentations found on the surface of a potato tuber. Each eye has the potential to sprout and grow into a new potato plant. When I first learned about potato eyes, I was fascinated to find out that each one could lead to a whole new potato, making them the perfect starting point for planting.
Why Use Eyes for Planting?
Using potato eyes for planting is a popular method because it’s an efficient way to propagate new plants. Instead of planting whole potatoes, which can lead to overcrowding and disease, using just the eyes helps ensure that each piece has enough space to grow. I discovered that this method not only maximizes yield but also makes the process more manageable. Each sprouted eye can produce a healthy plant that contributes to a bountiful harvest.
Types of Potatoes Suitable for Planting
Not all potatoes are created equal when it comes to planting. I’ve found that varieties like Yukon Gold, Red Bliss, and Russet are particularly well-suited for planting from eyes. These types tend to produce robust plants and yield delicious tubers. If you’re starting out, I recommend sticking with these varieties since they are tried and true for many gardeners, including myself. Plus, they often have great flavors for cooking!
Preparing to Plant Potatoes
Choosing the Right Potato Varieties
The first step in preparing to plant potatoes is selecting the right variety. I remember the excitement of choosing my first batch of seed potatoes. Each variety has its unique taste, texture, and growing conditions. For example, waxy potatoes like Charlotte are perfect for salads, while starchy varieties like Idaho Russet are best for baking and frying. Consider your cooking preferences and choose varieties that suit your taste.
When to Plant Potatoes
Timing is crucial when planting potatoes. I’ve learned that the best time to plant is in early spring, about 2-4 weeks before the last frost date in your area. The soil temperature should ideally be around 45°F (7°C) for optimal growth. I remember checking the weather patterns each year, waiting for the perfect moment to get my potatoes in the ground. Planting too early could lead to frost damage, while waiting too long might result in a reduced yield.
Understanding Your Soil Type
Knowing your soil type can significantly impact your potato-growing success. Potatoes thrive in well-drained, loose soil that allows their roots to expand freely. Sandy loam is often ideal. I once planted potatoes in heavy clay soil, and the results were disappointing—poor drainage led to rot and stunted growth. I recommend testing your soil to understand its composition and amend it as necessary with organic matter, like compost or peat moss, to improve drainage.
Preparing the Soil
Once I understood my soil type, I focused on preparing it for planting. This step is important because healthy soil creates strong plants. Start by tilling or turning the soil to a depth of about 12 inches. This not only aerates the soil but also mixes in any organic matter you’ve added. I remember the satisfaction of seeing the dark, crumbly soil ready for planting. It’s a great way to ensure your potatoes have a strong foundation to grow.
Gathering Necessary Tools and Materials
Before diving into planting, make sure you have all the necessary tools and materials ready. From my experience, the essential items include:
- Seed potatoes (with eyes)
- Garden spade or trowel
- Rake for leveling the soil
- Measuring tape for spacing
- Watering can or hose
- Mulch (optional, but helpful for moisture retention)
Having everything in one place saves time and makes the planting process much smoother. I’ve found that being prepared is half the battle when it comes to gardening!
Sprouting Potato Eyes
How to Cut Potatoes for Planting
When it comes to planting from eyes, cutting your seed potatoes correctly is crucial. I learned that each piece should ideally have at least one or two eyes. If the potato is large, cut it into chunks that are about 2 inches in size. Make sure to use a clean knife to prevent the spread of disease. After cutting, allow the pieces to dry for a day or two. This helps form a protective callus over the cut surface, which can reduce rot when planted.
Preparing Seed Potatoes
A few days before planting, I like to prepare my seed potatoes by letting them “chit.” This means placing the cut pieces in a cool, dry place with indirect sunlight. I’ve noticed that this encourages the eyes to sprout, which leads to stronger plants. Place them in an egg carton or a tray, with the cut side down and the eyes facing up. It’s like watching nature work its magic right in my kitchen!
Chitting Potatoes: Step-by-Step Guide
Chitting potatoes is a simple process that can really boost your planting success. Here’s how I do it:
- Choose healthy seed potatoes with at least one eye each.
- Cut them, if necessary, and let them dry for a day.
- Place the potatoes in a warm, dry area with indirect sunlight.
- Check them regularly for sprouting; this usually takes about two weeks.
Once you see small sprouts, you know they are ready to be planted. I find this stage incredibly rewarding, seeing the life start to emerge from what was once just a potato!
Signs of Healthy Sprouts
When my potato eyes start to sprout, I look for some key indicators to ensure they’re healthy. Healthy sprouts are typically green and firm, with a length of about 1-2 inches. If you notice the sprouts are long and spindly or have a yellow hue, they might be stretching for light, indicating they need to be planted soon. I always try to plant as soon as I see strong, healthy sprouts to give my potatoes the best chance of thriving.
Planting Potatoes
Choosing the Right Location
Finding the perfect spot for planting potatoes is one of the most exciting parts of the process. I’ve learned that potatoes love sunlight and need at least 6-8 hours of direct sun a day. When I first started, I often underestimated the importance of location. Now, I always look for an area that gets plenty of light and has good air circulation. I also make sure it’s close to a water source, which makes watering much easier. If you have a garden bed, that’s fantastic, but you can also plant them in large containers if space is limited.
How to Plant Potatoes from Eyes
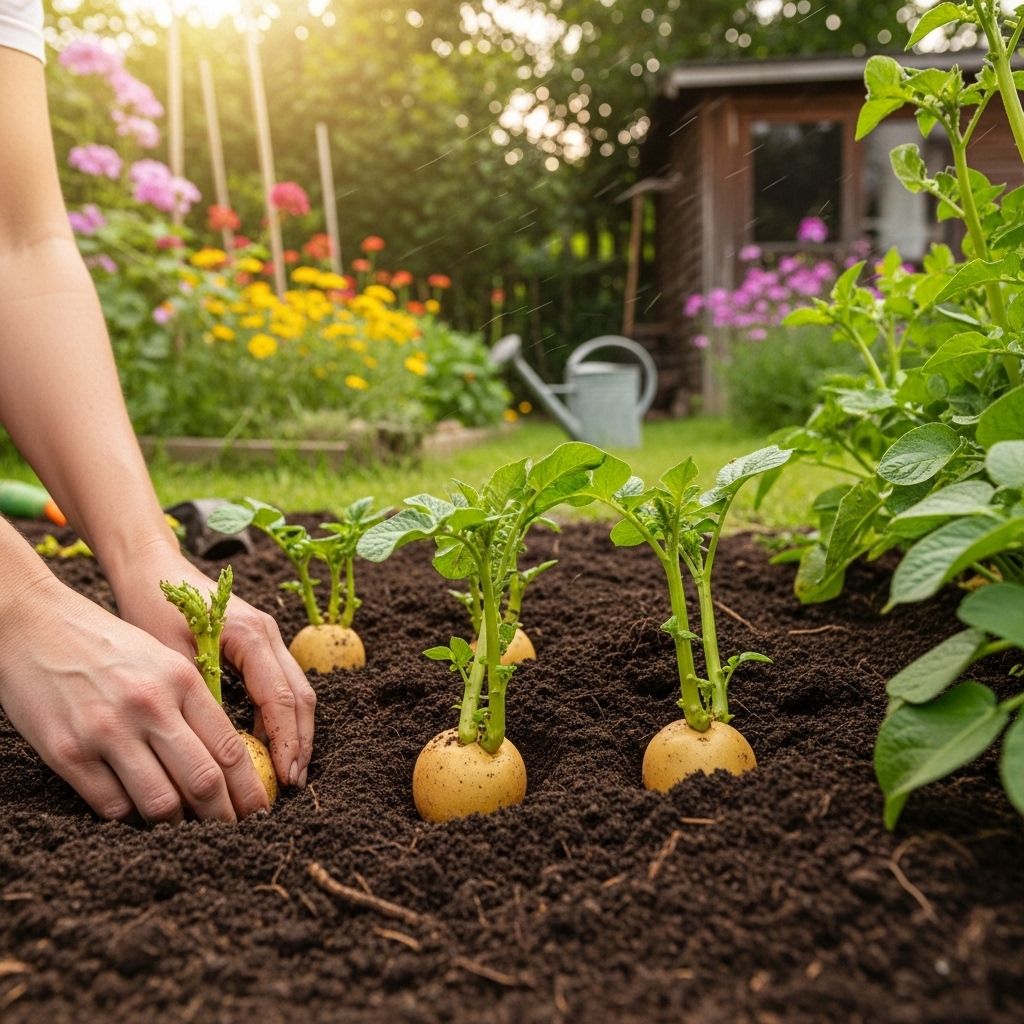
Planting the potato eyes is really where the magic begins. After preparing everything, it’s time to get your hands dirty! I usually dig a trench about 4-6 inches deep. You can use a garden spade or even just your hands, depending on how much soil you need to move. I place the cut pieces of potatoes, eyes facing up, into the trench. I’ve found that this little detail helps them grow more efficiently. If you’re planting whole potatoes, just place them whole down into the trench. Once you’ve spaced them out—about 12 inches apart—I cover them gently with soil, making sure not to compact it too much. I like to give them a little pat down, just enough to make sure they’re snug but not suffocated.
Spacing and Depth Considerations
Spacing your potato plants correctly is crucial for their growth. I remember when I planted my first batch too close together, and it resulted in smaller potatoes and some overcrowding issues. Ideally, you want to space your potato pieces about 12 inches apart in the row, with rows spaced about 2-3 feet apart. This allows them enough room to grow without competing too much for nutrients and water. As for depth, I’ve found that planting them about 4-6 inches deep is just right. If the soil is too deep, it can restrict their growth, and if it’s too shallow, they might not develop properly.
Watering Techniques for Newly Planted Potatoes
Watering is a critical factor I had to learn by experience. After planting, I always give my potatoes a good drink to settle them in. I’ve discovered that keeping the soil consistently moist is key, especially during the first few weeks after planting. However, I make sure to avoid overwatering, as soggy soil can lead to rot. I usually water deeply once a week, allowing the top inch of the soil to dry out between waterings. When the plants start to grow, I check the soil moisture regularly; this helps them establish a strong root system. I sometimes use mulch around the plants to help retain moisture and regulate soil temperature, which has worked wonders for me.
Caring for Potato Plants
Fertilizing Your Potato Crop
Fertilizing can seem daunting, but it’s essential for a healthy potato crop. I remember feeling overwhelmed when I first started, but I quickly learned that understanding the right nutrients is crucial. I usually opt for a balanced fertilizer that’s low in nitrogen since too much nitrogen can lead to lush foliage but fewer tubers. I apply a general-purpose fertilizer a few weeks after planting, then again when the plants are about a foot high. You can also use organic options like compost or well-rotted manure, which I favor for their ability to improve soil health while providing nutrients.
Weed Control Strategies
Keeping weeds at bay is an ongoing battle for any gardener. I’ve found that weeds compete with my potato plants for nutrients and water, which can hinder their growth. I tend to hand-pull weeds whenever I see them, especially when they’re small. I also love using mulch, as it not only helps with moisture retention but also smothers weeds. A layer of straw or grass clippings works great for this. I keep a close eye on my potato beds and try to remove weeds before they get too established, making my life a lot easier.
Managing Pests and Diseases
Pests can be a gardener’s nightmare, and I’ve had my fair share of encounters. Common culprits like aphids and Colorado potato beetles can devastate a crop if left unchecked. I’ve learned to inspect my plants regularly, especially the undersides of leaves. If I spot any pests, I usually try a strong spray of water to dislodge them. For more stubborn ones, I’ve had success using insecticidal soap or neem oil. Additionally, I keep an eye out for signs of diseases like blight, which can appear as dark spots on leaves. If I notice any, I promptly remove affected plants to prevent spreading.
Hilling Potatoes: Why and How
Hilling is one of those essential steps that I didn’t fully appreciate until I started doing it. Hilling involves mounding soil around the base of potato plants as they grow. I usually start hilling when the plants are about 6-8 inches tall. This process supports the stems, prevents the tubers from being exposed to sunlight (which can turn them green and toxic), and helps with moisture retention. Using a hoe or shovel, I gently pull soil up around the plants, creating a mound. I remember being amazed at how much healthier my potato plants looked after doing this, and it definitely boosted my yield!
Harvesting Potatoes
When to Harvest Potatoes
Knowing when to harvest potatoes is one of those skills that comes with experience. I remember the first time I was unsure and ended up pulling them too early, which taught me a valuable lesson. Generally, I find that the best time to harvest is when the plants start to flower and the leaves begin to yellow and die back. This usually occurs about 70-100 days after planting, depending on the variety. I keep a close eye on the plants, and when I see those signs, I know it’s almost time to dig up my treasure!
How to Harvest Potatoes Safely
Harvesting potatoes can feel like a mini adventure. I always approach it with excitement, but I know it’s important to be gentle to avoid damaging the tubers. I use a garden fork or spade to carefully lift the plants from the ground. I find it’s best to start a bit away from the base of the plant and work my way in to avoid piercing any potatoes. As I dig, I feel the thrill of discovery—sometimes, it’s like unearthing little gems! I usually lift the soil and potatoes together, allowing any dirt to fall away naturally. It’s important to handle them gently, as they can bruise easily.
Storing Your Harvest
Once I’ve harvested my potatoes, the next step is storing them properly to keep them fresh. I learned the hard way that storing them in direct sunlight can lead to sprouting or even spoilage. Instead, I find a cool, dark, and well-ventilated area for storage. A basemínkat or a cool pantry works great. I also spread them out in a single layer on a crate or in a burlap sack to allow air circulation. It’s essential to keep them away from moisture, as that can lead to rot. I often check my stored potatoes regularly to ensure they’re not sprouting or developing any soft spots. By taking these steps, I can enjoy the fruits of my labor for months to come!
Common Questions About Planting Potatoes from Eyes
Can You Plant Any Potato?
This is a question I often hear from beginners. While it might be tempting to plant any leftover potatoes from the kitchen, I’ve learned that not all potatoes are suitable for planting. I recommend using certified seed potatoes, which are specifically grown for planting and are disease-free. They have the best chance of producing healthy plants. However, if you’re using store-bought potatoes, make sure they’re organic and free from chemicals that inhibit sprouting. I once tried planting supermarket potatoes and ended up with a disappointing yield. Choosing the right potatoes truly makes a difference!
What to Do If Potatoes Don’t Sprout?
If you find that your potatoes haven’t sprouted, don’t despair! I’ve been there too. There could be a few reasons for this, such as using old seed potatoes, unsuitable temperatures, or too much moisture. First, I’d check the condition of the potatoes. If they’re soft or rotten, they won’t sprout. If they look okay, give them some more time in the right conditions. I also recommend ensuring they’re in a cool, dry place with indirect sunlight, which can encourage sprouting. If all else fails, consider replanting new seed potatoes and adjusting your methods based on what you learned from the previous attempt.
How Many Potatoes Can You Grow from One Eye?
This is a fun question that often comes up! From my experience, a single potato eye can produce one plant, which may yield anywhere from 3-10 potatoes, depending on factors like variety and growing conditions. I’ve had some plants produce even more on good years! It’s amazing to think that from just one small piece, you can end up with a handful of delicious potatoes. That’s one of the many reasons I love gardening—there’s such a rewarding payoff!
Tips for First-Time Potato Planters
If you’re just starting out, I have a few tips that I wish I had known earlier. First, be patient! Potatoes take time to grow, and it’s essential to give them the care they need without rushing the process. Second, keep track of your planting dates and varieties. I often jot down notes in a gardening journal, which helps me remember what worked and what didn’t. Lastly, don’t hesitate to reach out to local gardening groups or online communities for advice—they can be a goldmine of information. Gardening is a learning experience, and every season brings new challenges and successes!
Frequently Asked Questions
“`html
What Are Potato Eyes?
Potato eyes are small buds or indentations found on the surface of a potato tuber. Each eye has the potential to sprout and grow into a new potato plant.
Why Use Eyes for Planting?
Using potato eyes for planting is efficient as it helps avoid overcrowding and disease. Each sprouted eye can produce a healthy plant, maximizing yield and making the process more manageable.
What Types of Potatoes Are Suitable for Planting?
Varieties like Yukon Gold, Red Bliss, and Russet are particularly well-suited for planting from eyes. These types tend to produce robust plants and yield delicious tubers.
When Is the Best Time to Plant Potatoes?
The best time to plant potatoes is in early spring, about 2-4 weeks before the last frost date in your area, with an ideal soil temperature of around 45°F (7°C).
How Should I Prepare My Soil for Planting Potatoes?
Prepare the soil by tilling or turning it to a depth of about 12 inches and mixing in organic matter to improve drainage, ensuring a strong foundation for the plants.
How Do I Cut Potatoes for Planting?
Each piece should ideally have at least one or two eyes. Cut large potatoes into chunks about 2 inches in size and allow them to dry for a day or two to form a protective callus.
What Is Chitting Potatoes?
Chitting potatoes involves placing cut pieces in a cool, dry place with indirect sunlight to encourage the eyes to sprout, leading to stronger plants.
How Do I Know When to Harvest Potatoes?
Harvesting is best when the plants start to flower and the leaves begin to yellow and die back, usually occurring about 70-100 days after planting.
How Should I Store My Harvested Potatoes?
Store harvested potatoes in a cool, dark, and well-ventilated area. Spread them out in a single layer to allow air circulation and keep them away from moisture to prevent rot.
Can You Plant Any Potato?
It’s recommended to use certified seed potatoes that are disease-free. If using store-bought potatoes, ensure they are organic and free from chemicals that inhibit sprouting.
“`