
The key to planting watermelon for big, sweet fruit is selecting the right variety, preparing your garden properly, and ensuring optimal growing conditions. Having grown watermelons myself, I’ve learned that these steps can make all the difference in achieving that juicy, sweet taste we all love.
Table of Contents
Understanding Watermelon Varieties
When it comes to watermelons, knowing the different varieties can help you choose the best one for your garden and taste preferences. I remember when I first started growing watermelons; I was overwhelmed by the choices. It’s fascinating how much variety there is, and each type has its own unique flavor, texture, and growing requirements. If you’re curious about the number of sugar baby watermelons per plant indoors, there are some great tips to explore.
Seedless vs. Seeded Watermelons
One of the first decisions you’ll make is whether to grow seedless or seeded watermelons. Seedless varieties are convenient and often preferred by those who want a smooth eating experience. However, I found that seedless watermelons can sometimes lack the depth of flavor found in traditional seeded ones. Seeded watermelons tend to be juicier and sweeter, which is why I often lean toward them for a truly satisfying summer treat.
Popular Varieties for Sweetness
There are several popular varieties known for their sweetness. For example, the ‘Sugar Baby’ watermelon is renowned for its small size and incredibly sweet flesh. I’ve had great success with ‘Charleston Gray’, which is not only large but also boasts a delightful taste. If you’re in the mood for something different, try the ‘Crimson Sweet’, which is known for its bright red inside and high sugar content. Each of these varieties brings something special to the table, and I encourage you to experiment with a few to discover your favorites.
Choosing the Right Variety for Your Region
Choosing the right variety also means considering your local climate. Some watermelons thrive in warmer regions, while others can handle cooler temperatures. For example, in my experience, ‘Moon and Stars’ is a variety that tolerates heat and is quite successful in the southern states. On the other hand, if you live in a cooler area, you might want to focus on early-maturing varieties that can produce before the frost hits. Always check with local gardening groups or extension services to find out what works best in your area—it can save you a lot of trial and error.
Preparing Your Garden for Watermelon Planting
Once I settled on the right variety, the next step was preparing my garden. I learned that watermelons need specific conditions to thrive, and getting this part right can significantly affect the yield and sweetness of the fruit. It’s all about giving them the best possible start.
Soil Requirements and Preparation
Watermelons love well-drained, sandy soil rich in organic matter. In my case, I started by mixing compost into the soil to enhance its fertility. It’s an easy way to improve soil structure, which helps with drainage and nutrient retention. I recommend testing your soil for its nutrient content and texture. If you find that your soil is heavy or clay-like, consider raised beds or adding sand to improve drainage. Watermelons don’t like “wet feet,” so proper drainage is crucial to avoid root rot.
Choosing the Right Location
Sunlight is another critical factor. Watermelons need full sun, which means at least 6 to 8 hours of direct sunlight daily. I remember I made the mistake of planting in partial shade one year, and my melons turned out smaller and less flavorful. Choose a spot that gets plenty of sunlight, and make sure it’s also sheltered from strong winds, which can damage the vines. If you have a garden layout in mind, position the taller plants away from the watermelons to avoid shading them.
Proper pH Levels for Optimal Growth
Another thing I learned was the importance of soil pH. Watermelons flourish in slightly acidic to neutral pH levels, ideally between 6.0 and 7.0. A simple soil test can reveal your pH level, and if it’s too low or too high, you can amend it with lime or sulfur as needed. This step can take a little time, but trust me, it’s worth it for the health of your plants.
When to Plant Watermelon
Timing is everything when it comes to planting watermelon. I’ve found that planting too early or too late can lead to disappointing results, so I pay close attention to the weather and soil conditions.
Understanding Frost Dates
Watermelons are very sensitive to frost, so I always make sure to plant after the last frost date in my area. You can find this information online or through local gardening resources. In spring, I tend to plant my seeds or seedlings around mid to late May, providing a buffer against late frosts. Remember, it’s better to wait a little longer to ensure that your plants get the warmth they need to thrive.
Ideal Soil Temperature for Germination
The soil temperature is another key factor. Watermelon seeds germinate best when the soil temperature is between 70°F and 95°F. I’ve used a simple soil thermometer to check the temperature before planting. If it’s too cool, I usually wait a week or two. Sometimes, I even use black plastic to warm the soil ahead of time. It’s a little trick I picked up that really helps with germination rates.
Seasonal Considerations for Different Climates
The growing season can vary based on where you live. In warmer regions, I find that direct seeding can work well, while in cooler climates, starting seeds indoors or purchasing transplants might be the better route. I’ve learned that each climate has its quirks, so adapting my planting schedule based on local conditions was crucial for me. Pay attention to seasonal changes and adjust accordingly for the best results.
Planting Techniques for Watermelon
When it comes to planting watermelon, I’ve discovered that the technique you use can greatly affect how well your plants thrive and ultimately how sweet the fruit will be. Over the years, I’ve experimented with different methods, and I believe that understanding these planting techniques can set you up for success.
Direct Seeding vs. Transplanting
One of the first decisions you’ll face is whether to seed directly into the garden or to start seedlings indoors and transplant them. Personally, I’ve had my share of both experiences. Direct seeding is often easier and less labor-intensive. I remember planting my seeds directly into the warm soil, and within a week or two, I could see those little sprouts popping up. However, I found that starting seeds indoors gives you a head start, especially in cooler climates. This method allows you to control the environment more closely and gives your plants a better chance to grow strong before facing outdoor conditions.
I’ve learned that if you opt for transplanting, it’s vital to harden off your seedlings before moving them outdoors. This means gradually exposing them to sunlight and outdoor conditions over a week or so. I made the mistake of moving my seedlings directly to the garden without this transition, and they suffered from shock.
Spacing and Depth for Optimal Growth
Spacing is another crucial factor that I’ve come to appreciate. Watermelons love to spread out, and I usually give them plenty of room. In my garden, I aim for about 3 to 4 feet between each plant. This not only allows for proper airflow but also helps prevent diseases. If they’re too crowded, they can become stunted and won’t produce the sweet fruit we’re after.
As for planting depth, I dig a shallow hole, about 1 inch deep for the seeds. I’ve found that covering them lightly with soil helps them retain moisture. After planting, I give them a gentle watering, making sure not to drown them. I’ve learned that watermelons prefer a consistent moisture level, so I always keep an eye on them during the early stages.
Companion Planting Options
Companion planting has also been a game-changer for me. I’ve discovered that certain plants can benefit watermelon growth while keeping pests at bay. For example, planting marigolds nearby not only adds a pop of color but also helps deter harmful insects. I also like to plant basil, which has shown to improve the flavor of the melons while keeping pests away. It’s a win-win!
Another option I’ve tried is planting corn alongside my watermelons. The corn provides some shade, which can be helpful in the hottest part of the summer, while the watermelon vines can spread out below. I remember the first time I tried this method; it felt like a little ecosystem was growing, and the watermelons thrived! Just be cautious about overcrowding and ensure each plant has enough space to grow.
Watering and Nutrient Requirements
Watering and nutrition are critical aspects of growing watermelons, and I’ve learned a lot through trial and error. Getting the balance right can mean the difference between a lackluster harvest and a bountiful, sweet crop.
Understanding Watermelon Water Needs
Watermelons are about 90% water, which is why they require consistent moisture. I typically water my plants deeply once or twice a week, depending on the weather. When I first started gardening, I used to water every day, but I learned that this can lead to shallow root systems. Deep watering encourages the roots to grow down into the soil, making them more resilient.
During hot spells, I’ve found that I need to increase my watering frequency. I try to avoid getting the leaves wet to reduce the risk of fungal diseases, so I aim for a soaker hose or drip irrigation. This method not only conserves water but also delivers moisture directly to the roots.
Fertilization Schedule for Sweet Fruits
Nutrient management is another area I’ve focused on over the years. Watermelons thrive on rich soil, so I usually apply a balanced fertilizer when I plant them. As they grow, I switch to a fertilizer higher in phosphorus and potassium, which promotes flowering and fruit development. I’ve learned to be cautious, though; too much nitrogen can lead to lush foliage but fewer fruits. Keeping it balanced has always resulted in sweeter melons for me.
Organic vs. Chemical Fertilizers
In my experience, I prefer organic fertilizers, as they not only nourish the plants but also improve soil health over time. I often use compost and well-rotted manure to boost nutrients naturally. I remember when I first tried chemical fertilizers; they worked quickly but left me feeling uneasy about the long-term impact on the soil and environment. Making the switch to organic methods felt right and ultimately led to tastier watermelons!
Pest and Disease Management
Pest and disease management can be a real challenge when it comes to growing watermelons. I’ve had my fair share of battles with bugs and blights, and I quickly learned that being proactive is key to keeping my plants healthy and productive.
Common Pests Affecting Watermelons
One of the most common pests I’ve encountered is the cucumber beetle. These little critters can do a number on young watermelon plants, feeding on the leaves and transmitting diseases. I remember the first time I saw them; it was alarming! To combat cucumber beetles, I’ve found that row covers can be very effective in keeping them away from my seedlings. Once the plants are established, I usually remove the covers to allow for pollination.
Another pest I’ve dealt with is aphids. These tiny insects suck the sap from the plants, which can weaken them. In my experience, I try to keep an eye out for any signs of aphids and act quickly if I see them. I often spray a mixture of water and dish soap to help control their population. It’s a simple solution that tends to work well without harming beneficial insects.
Disease Prevention and Treatment
Diseases can also wreak havoc on watermelon plants, and I’ve learned that prevention is much easier than treatment. One major concern is powdery mildew, which can appear as a white powdery substance on the leaves. To prevent this, I make sure to space my plants properly for good airflow and avoid overhead watering. If I do spot powdery mildew, I use a baking soda solution to treat it. It’s been effective for me and is a safer alternative to chemical fungicides.
Another disease that I’ve encountered is fusarium wilt, which can be devastating. It’s essential to choose disease-resistant varieties when you can. I’ve had success with ‘Sugar Baby,’ which is known to resist some diseases, giving me peace of mind as I grow my melons. Regularly rotating my crops also helps to break the disease cycle.
Organic Pest Control Methods
Over the years, I’ve become a big fan of organic pest control methods. Not only do they protect my plants, but they also keep the environment safe. I often use neem oil, which is derived from the seeds of the neem tree. This natural pesticide works wonders against a variety of pests, and I’ve found it to be particularly effective on aphids and spider mites.
Additionally, I’ve learned to attract beneficial insects to my garden, like ladybugs and lacewings, which help keep pest populations down. I’ve planted flowers like yarrow and dill nearby to encourage these helpful critters. Watching them thrive in my garden has been one of the more rewarding experiences of gardening!
Sometimes, I even set up barriers using diatomaceous earth around my plants. It’s a natural powder that can deter slugs and other crawling pests. I remember the first time I sprinkled it around my melons; it felt like I was creating a protective fortress for my plants. It’s satisfying to know I’m doing my part to keep my garden healthy without resorting to harsh chemicals.
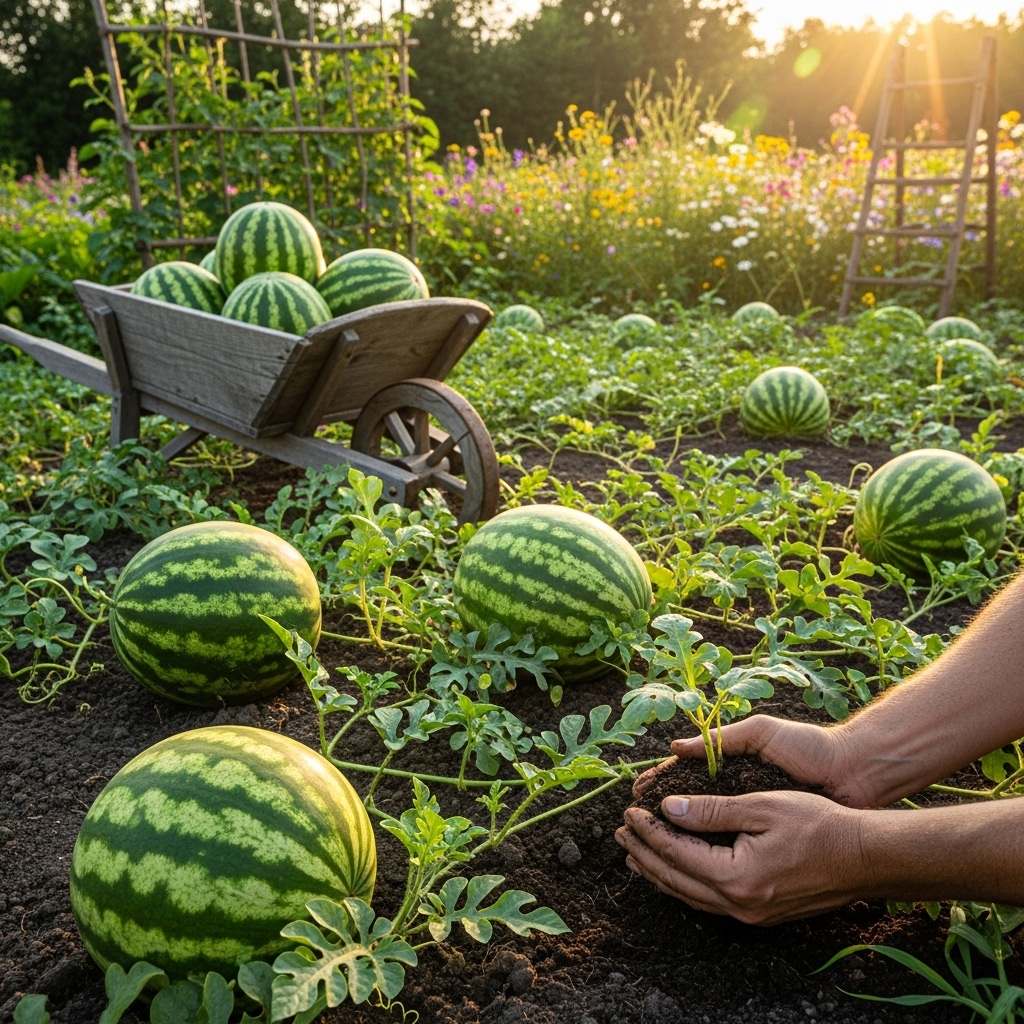
Harvesting Watermelon
After all the care and attention I’ve put into growing my watermelons, the time to harvest is one of the most exciting moments. I’ve learned that understanding how to determine the right time to pick them can make all the difference in taste and texture. If you’re unsure about how to tell if watermelon is ripe, there are several signs to look for.
Signs of Ripeness
One of the first signs I look for is the color of the watermelon’s skin. When it’s ripe, the underside where it rests on the ground should turn a creamy yellow. I’ve noticed that if it’s still green, it’s not quite ready. Another telltale sign is the tendril closest to the fruit. When it turns brown and dries up, it usually means the watermelon is ripe and ready to be picked.
Knocking on the watermelon is also a trick I’ve picked up. A ripe watermelon produces a deep, hollow sound when tapped, while an unripe one sounds dull. I remember the thrill the first time I knocked on one and heard that satisfying sound—it felt like I was in tune with the plant!
Best Practices for Harvesting
When it comes time to harvest, I always use a sharp knife or garden shears to avoid damaging the vine. I’ve made the mistake of yanking on the fruit, thinking I could just pull it off the vine. That usually ends up with an unsightly mess and a damaged plant. Instead, I cut the stem a few inches above the watermelon, which helps ensure the plant can continue to thrive even after the harvest.
It’s also essential to harvest on a dry day to minimize the risk of disease. After picking, I gently place the watermelons in a cool, shaded area to prevent them from getting too hot and spoiling. I remember the first time I harvested, I was so excited that I didn’t think about the heat, and a few of them started to spoil quicker than I’d anticipated!
Post-Harvest Handling for Sweetness Preservation
After harvesting, I’ve learned that how I handle the watermelons can impact their flavor and longevity. I try to keep them out of direct sunlight and store them in a cool, dry place. I’ve found that watermelons can last quite a while if treated well, but I always aim to enjoy them fresh. There’s nothing quite like biting into a sweet slice of watermelon that’s been lovingly cared for all season long!
Frequently Asked Questions
What are the key steps to planting watermelon for sweetness?
The key steps include selecting the right variety, preparing the garden properly, and ensuring optimal growing conditions.
What is the difference between seedless and seeded watermelons?
Seedless watermelons are convenient and often preferred for a smooth eating experience, but they may lack the depth of flavor found in traditional seeded watermelons, which tend to be juicier and sweeter.
Which watermelon varieties are known for their sweetness?
Popular sweet varieties include ‘Sugar Baby’, known for its small size and sweet flesh; ‘Charleston Gray’, which is large and flavorful; and ‘Crimson Sweet’, recognized for its bright red inside and high sugar content.
How do I prepare my garden for planting watermelons?
Prepare your garden by ensuring well-drained, sandy soil rich in organic matter, and choose a location that receives full sunlight for at least 6 to 8 hours daily.
What is the ideal soil pH for growing watermelons?
Watermelons flourish in slightly acidic to neutral pH levels, ideally between 6.0 and 7.0.
When is the best time to plant watermelon seeds?
Plant watermelon seeds after the last frost date in your area, typically around mid to late May, ensuring that soil temperatures are between 70°F and 95°F for optimal germination.
What are effective watering practices for watermelons?
Watermelons require consistent moisture, so it’s best to water deeply once or twice a week, avoiding daily watering to encourage deep root growth. Utilizing soaker hoses or drip irrigation can help maintain moisture at the roots.
How can I manage pests and diseases in my watermelon garden?
To manage pests like cucumber beetles and aphids, use row covers and organic solutions such as water and dish soap. For diseases like powdery mildew, ensure good airflow between plants and avoid overhead watering.
What are signs that a watermelon is ripe for harvesting?
Signs of ripeness include a creamy yellow underside where it rests on the ground, a brown and dried-up tendril closest to the fruit, and a deep, hollow sound when tapped.
How should I handle watermelons after harvesting?
After harvesting, handle watermelons gently, store them in a cool, dry place, and avoid direct sunlight to preserve their flavor and longevity.
Read Interesting article: Annual Plant Meaning – All You Need to Know With examples