
Repotting a plant without killing it involves careful attention to timing, technique, and post-repotting care. I’ve learned through my own experiences that the right approach can help your plant thrive in its new home.
Understanding the Importance of Repotting
Repotting is not just a chore; it’s an essential part of keeping your plants healthy. Over time, plants can outgrow their pots, leading to root crowding and nutrient depletion in the soil. I remember when I first started my plant journey, I didn’t think much of repotting until I noticed my plants weren’t growing as they once did. That’s when I realized just how crucial it is. For more information, check out Signs Your Houseplant Needs Repotting (And How to Do It!).
Benefits of Repotting Your Plants
When done correctly, repotting has numerous benefits for your plant. First and foremost, it gives the roots more space to grow, which can promote healthier and stronger plants. I’ve seen firsthand how a plant can flourish after being moved to a larger pot. Additionally, repotting allows you to refresh the soil, giving your plant access to vital nutrients it may have depleted over time. Last summer, I repotted my pothos, and I was amazed at how lush and vibrant it became shortly after. The improvement was almost immediate!
Another significant benefit is improved drainage. Older soil can become compacted, leading to water retention and root rot. When I switched my snake plant to a new pot with fresh soil, I noticed a difference in drainage, and my plant seemed much happier. Lastly, repotting can help you control pests and diseases. If you notice signs of pests in the soil, repotting can give you a fresh start without those unwanted guests.
Signs Your Plant Needs Repotting
One of the key things I’ve learned in my journey is recognizing when a plant needs repotting. There are several telltale signs. First, if you see roots growing out of the drainage holes, that’s a clear indicator that your plant has outgrown its pot. When I noticed my rubber plant’s roots peeking out, I knew it was time for a change.
Another sign is stunted growth. If your plant has stopped growing or is growing slower than usual, it might be a sign that it’s root-bound or lacking nutrients. I’ve experienced this with my spider plant, which started to look a bit sad until I repotted it. Lastly, if the soil dries out too quickly after watering, it may be time to repot. Old soil can lose its ability to retain moisture, which I found out the hard way with my peace lily.
Common Mistakes When Repotting
While repotting is essential, I’ve also learned that it can be easy to make mistakes. One of the biggest errors I made was choosing a pot that was too large. It’s tempting to give your plant a lot of room to grow, but too much space can lead to overwatering and root rot. I remember once using a pot that was twice the size of the original, and my plant struggled for weeks before I realized my mistake.
An equally common mistake is not using fresh potting mix. I used to think I could just reuse old soil, but that often led to nutrient-poor conditions. Each time I repot, I make sure to use a fresh, high-quality potting mix suited for the type of plant I’m handling. Lastly, I’ve sometimes been too rough with the roots when removing the plant from its pot. Gentle handling is key; I’ve learned that roots are delicate and need care during this transition.
Choosing the Right Time to Repot
Timing can make all the difference when it comes to repotting. I’ve found that picking the right moment is crucial for minimizing stress on my plants and ensuring a smooth transition.
Best Seasons for Repotting
In my experience, spring is the ideal season for repotting most plants. As the days get longer and temperatures warm up, plants naturally enter a growth phase. I’ve noticed that repotting in spring gives them the best chance to adapt to their new environment. However, if you live in a region where it’s warm year-round, you may find that your plants can be repotted at different times. I often check the specific needs of my plants to see if they have any preferences.
Signs of a Root-Bound Plant
As I mentioned earlier, root-bound plants are those that have outgrown their pots. If you notice roots growing out of the drainage holes or circling around the bottom of the pot, that’s a sure sign. I once had a peace lily that became so root-bound, it started to wilt despite regular watering. It was a wake-up call to pay attention to signs and act accordingly.
When to Avoid Repotting
There are also times when I avoid repotting altogether. For instance, if a plant is flowering or fruiting, I let it be. Repotting during these phases can stress the plant, which might lead to dropping flowers or fruit. I learned this lesson the hard way with my flowering cactus. Additionally, if a plant is sick or recovering from shock, it’s best to wait until it’s back to health before making any changes. I’ve found that patience is just as important as action in plant care.
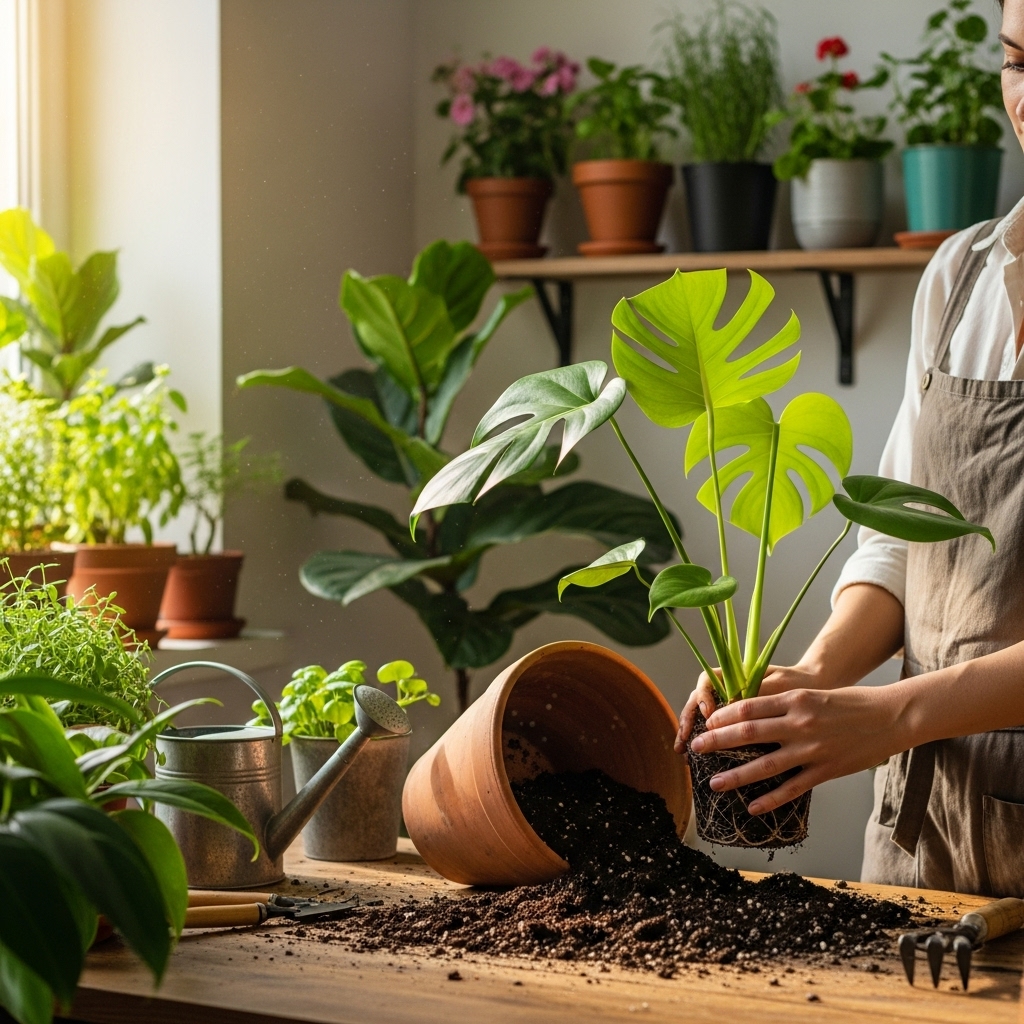
Gathering Necessary Materials
Before diving into the repotting process, I’ve learned that gathering the right materials is essential. It’s not just about having the plant and the pot; it’s about preparing everything you’ll need for a smooth transition. Trust me, having everything ready makes the experience much easier and less stressful for both you and your plant.
Types of Pots: Choosing the Right Size
Choosing the right pot is one of the most crucial steps in repotting. I’ve made the mistake of picking pots that were either too small or too large, and I can tell you that both can lead to problems. Ideally, the new pot should be about 1 to 2 inches larger in diameter than the current pot. This gives the roots enough space to grow without overwhelming the plant. I’ve found that terracotta pots work wonders for many types of plants because they allow for better air circulation and moisture control. But I also love using decorative pots for the aesthetic appeal, as long as they have adequate drainage holes.
Potting Mix: What to Use
The potting mix is another essential element in the repotting process. I used to think any old soil would do, but I quickly realized that using the right mix can make all the difference. For my tropical plants, I opt for a lightweight potting mix that retains moisture but still provides excellent drainage. For succulents, I’ve learned to use a gritty, well-draining mix to prevent rot. I often check the specific needs of each plant before purchasing a potting mix. It may seem a bit overwhelming, but taking the time to find the right soil has always paid off in my experience. For more tips on this topic, see Step-by-Step Guide to Planting Succulents Like a Pro!
Tools Needed for Repotting
Having the right tools on hand can make the repotting process much smoother and more efficient. I always start with a pair of clean pruning shears for any necessary root trimming. A trowel is useful for adding soil to the pot, and I’ve found gloves can protect my hands from dirt and potential scratches. I also recommend keeping a small watering can handy for hydrating the soil after repotting. It’s amazing how much easier it is to work when you have everything within reach!
Step-by-Step Guide to Repotting
Now that we’ve covered the materials needed, let’s walk through the actual repotting process. I remember feeling a bit anxious the first time I repotted a plant, but breaking it down into steps helped me feel more confident.
Preparing Your Plant for Repotting
Before starting, I always prepare my plant by watering it a day or two in advance. This helps to reduce stress on the plant during the repotting process and makes it easier to remove from its pot. I also check for any visible pests or issues that need to be addressed. Taking a moment to inspect the plant can save me from problems down the road.
Removing the Plant from Its Current Pot
When it’s time to remove the plant, I gently squeeze the sides of the pot to loosen the soil. If the plant is stubborn, I carefully run a knife around the edges to detach it from the sides. I remember the first time I tried to yank my plant out without loosening the soil—I ended up damaging the roots. Patience is key here! Once it’s free, I gently lift it out, supporting the base of the plant.
Inspecting and Pruning Roots
After removing the plant, I take a few moments to inspect the roots. I look for any dark or mushy roots, as these might indicate rot. If I find any, I trim them away with my pruning shears. I’ve learned that healthy roots should look firm and white. This step not only helps keep the plant healthy but also allows it to adapt more easily to its new home.
Placing the Plant in the New Pot
Now comes the exciting part! I add a layer of fresh potting mix at the bottom of the new pot before placing the plant in. I make sure the plant is centered and sitting at the same depth it was in the previous pot. It’s a small detail, but I’ve found that it helps the plant acclimate better. After positioning it, I gently fill in around the edges with more potting mix, ensuring there are no air pockets.
Filling with Potting Mix and Watering
Once the plant is secure in its new home, I fill in any remaining gaps with potting mix. I like to give the soil a gentle press to settle it in place, but I’m careful not to compact it too much. After that, I give my plant a thorough watering. This helps to settle the soil and reduces transplant shock. I usually let the water drain out, ensuring the plant doesn’t sit in excess moisture.
Post-Repotting Care
After repotting, I’ve learned that proper care is essential for helping my plants adjust. It can be a bit of a shock for them, so I try to be attentive to their needs in the following days.
Optimal Light Conditions After Repotting
One of the first things I do after repotting is to reassess the plant’s light conditions. I’ve noticed that many plants appreciate a little break from direct sunlight after being repotted. I typically move them to a spot with indirect light for a week or so, allowing them to acclimate without the added stress of intense sun.
Watering Schedule: What to Follow
My watering schedule also changes a bit after repotting. Initially, I make sure to keep the soil slightly moist but not soggy. I check the moisture level regularly, as I’ve found that new potting mixes can dry out faster than established ones. Gradually, I return to my normal watering routine as the plant settles in.
Signs of Stress: How to Identify and Remedy
It’s essential to pay close attention to any signs of stress in my plants after repotting. Wilting, yellowing leaves, or dropping leaves can indicate that something isn’t right. If I notice any of these signs, I check the soil moisture and light conditions. Sometimes, a little tweak can make all the difference. I remind myself that it’s a part of the process, and with care and attention, I can help my plants thrive again.
Specific Plant Types and Their Repotting Needs
Succulents and Cacti
When it comes to succulents and cacti, I’ve found that they have their own unique needs during the repotting process. These hardy plants prefer well-draining soil, as they can easily suffer from root rot if water sits around their roots. I usually opt for a cactus mix or create my own by combining potting soil with sand or perlite. This helps achieve the right drainage.
Timing is also important. I like to repot my succulents and cacti during the warmer months when they are actively growing, usually in spring or early summer. This way, they can recover quickly from the shock of being moved. I remember one time I repotted my jade plant in the winter, and it took much longer for it to bounce back. It just sat there looking sad for weeks!
Another tip I learned is to avoid watering immediately after repotting. Giving the soil some time to settle and allowing the roots to adjust helps prevent excess moisture. After a week or so, I start to water gently, making sure the soil dries out completely between waterings. This approach has worked wonders for my succulent collection.
Tropical Plants
Tropical plants, like philodendrons and pothos, tend to be a bit more forgiving when it comes to repotting, but they still have specific needs. I typically repot these plants in spring, just as they’re gearing up for their growth phase. The fresh potting mix provides them with the nutrients they need to thrive.
One thing I’ve learned is that tropical plants appreciate a humid environment. After repotting, I often mist their leaves or place them near a humidity tray to help them adjust. I remember repotting my monstera and forgetting about humidity; the poor thing started dropping leaves. Now, I always keep humidity in mind!
When it comes to pot size, I generally choose a pot that’s about 2 inches larger in diameter. This gives the roots room to grow without overwhelming the plant. It’s also important to keep an eye on the soil moisture level; tropical plants like to be kept moist but not soggy. I’ve had great success by checking the top inch of soil before watering.
Houseplants: Ferns and Foliage Plants
Ferns and other foliage plants have their own quirks when it comes to repotting. I’ve noticed that they often prefer a pot that isn’t too big, as they can thrive in tighter spaces. When I repotted my maidenhair fern, I chose a pot that was only one inch larger, and it seemed to appreciate the snug fit.
These plants also benefit from a light, airy potting mix. I typically use a blend that includes peat moss and perlite for good drainage while maintaining some moisture. After repotting, I try to keep the soil evenly moist, as ferns can be sensitive to changes in their environment. I once let a fern dry out too much after repotting, and it took weeks for it to perk back up!
Light conditions are also vital. I usually position my ferns in bright, indirect sunlight post-repotting. Too much direct sun can scorch their delicate leaves, so I’ve learned to be mindful of their light preferences to help them thrive.
Flowering Plants
Repotting flowering plants requires special attention, especially if they’re in bloom. I typically wait until after the flowering period to repot, as this can reduce stress and prevent flowers from dropping. However, if a flowering plant shows signs of being root-bound, I’ll gently repot it while being extra cautious.
When I repotted my African violets, I made sure to use a mix designed for flowering plants that retains moisture without becoming soggy. After repotting, I placed them in a spot with bright, indirect light, as they thrive in those conditions. I’ve seen how happy they are when they’re cared for properly—vibrant blooms and lush leaves!
Watering practices also differ for flowering plants. I check the moisture level carefully, making sure the top inch of soil is dry before watering. It’s a balancing act, but I’ve learned that keeping them hydrated helps maintain their flowers and foliage. Seeing my plants flourish after repotting is always rewarding, reminding me how important it is to cater to their specific needs.
Frequently Asked Questions
What is the importance of repotting plants?
Repotting is essential for keeping plants healthy as it prevents root crowding and nutrient depletion in the soil, allowing plants to thrive in their new environment.
What are the benefits of repotting a plant?
Repotting provides roots with more space to grow, refreshes the soil with vital nutrients, improves drainage, and helps control pests and diseases.
How can I tell if my plant needs repotting?
Signs that a plant needs repotting include roots growing out of drainage holes, stunted growth, and soil that dries out too quickly after watering.
What are common mistakes to avoid when repotting?
Common mistakes include choosing a pot that is too large, not using fresh potting mix, and being too rough with the roots when removing the plant from its pot.
When is the best time to repot a plant?
Spring is generally the ideal season for repotting most plants as they enter a growth phase, but specific plant needs may vary based on region and type.
What should I prepare before repotting?
Before repotting, gather necessary materials such as a suitable pot, fresh potting mix, and tools like pruning shears and a trowel for a smooth transition.
How do I remove the plant from its current pot?
Gently squeeze the sides of the pot to loosen the soil, and if needed, run a knife around the edges to detach it before carefully lifting the plant out.
What post-repotting care should I provide?
After repotting, reevaluate the plant’s light conditions, adjust the watering schedule to keep the soil slightly moist, and monitor for signs of stress such as wilting or yellowing leaves.
How should I handle succulents and cacti during repotting?
Succulents and cacti should be repotted in well-draining soil during warm months and not watered immediately after repotting to allow roots to adjust.
What special considerations should I keep in mind for flowering plants during repotting?
For flowering plants, wait until after the flowering period to repot to reduce stress and carefully monitor moisture levels to maintain their blooms and foliage.