
The best time to plant iris bulbs for optimal blooms is in the fall, typically between late August and early October, depending on your climate. Planting them during this time allows the bulbs to establish roots before winter, leading to vibrant blooms in the spring. Read Interesting article: How to Plant a Peony for Stunning Blooms
Understanding Iris Bulbs
To truly appreciate when to plant iris bulbs, it’s essential to understand what these beautiful plants are all about. Iris bulbs are fascinating and versatile perennials that can bring color and elegance to any garden. With a variety of types and characteristics, knowing more about them can help us make informed decisions about planting and caring for them.
Types of Iris Bulbs
Iris plants come in several types, each with unique features and growing needs. The most common types are:
- Bearded Iris: Known for their distinctive fuzzy beards on the falls, these irises are a favorite among gardeners. They thrive in well-draining soil and full sun.
- Beardless Iris: This category includes Louisiana, Siberian, and Japanese irises. They don’t have the characteristic beards and are generally more tolerant of wet soil.
- Dwarf Iris: Perfect for smaller gardens or containers, these compact varieties bloom early in the spring.
Understanding the type of iris you want to plant will help you know their specific needs in terms of space, sunlight, and water.
Common Varieties of Iris
Within these types, there are many popular varieties to consider. Some of my favorites include:
- ‘Beverly Sills’: A stunning bearded iris with soft peachy-pink blooms.
- ‘Japanese Iris’: These have delicate, flat flowers and thrive in moist conditions, making them great for water gardens.
- ‘Siberian Iris’: With tall, slender stems and vibrant colors, they’re perfect for adding height to flower beds.
Choosing the right variety depends on your gardening style and the conditions in your garden. I’ve found that mixing a few different types can create a beautiful, varied display.
Characteristics of Healthy Iris Bulbs
When selecting iris bulbs, it’s crucial to pick healthy ones to ensure your planting success. Healthy iris bulbs should be firm to the touch, without any soft spots or mold. The color should be vibrant and rich. I always check for a robust root system, as this is key to strong growth. Healthy bulbs will give you the best chance of gorgeous blooms come springtime.
It’s also important to note that iris bulbs can be sensitive to storage conditions. If you buy them in advance, make sure to keep them in a cool, dark place until you’re ready to plant.
When to Plant Iris Bulbs
Timing is everything when it comes to planting iris bulbs. Knowing when to plant can make all the difference in having a beautiful display come spring. I remember my first experience planting irises; I was eager to get them in the ground, but I quickly learned that patience pays off.
Ideal Planting Seasons
As mentioned earlier, the best time to plant iris bulbs is in the fall. This is especially true for bearded irises. Planting during this time allows the bulbs to develop strong roots before the ground freezes. In most regions, late August to early October is ideal. I like to mark my calendar to remind myself to get them in the ground before the first frost.
For beardless varieties, such as Japanese and Siberian irises, spring planting is also possible. However, I’ve noticed that fall planting generally leads to healthier plants and better blooms. If you decide to plant in spring, aim for early spring, as soon as the soil is workable.
Factors Influencing Planting Time
Several factors can influence your planting schedule. These include climate, soil temperature, and local weather patterns. For instance, if you live in a warmer climate, you may be able to plant a bit earlier in the fall. I’ve come to realize that it’s essential to pay attention to the weather as it can shift unexpectedly. A late summer heatwave, for example, could impact when I decide to plant.
Soil temperature is another key factor. Ideally, the soil should be around 60°F (15°C) when you plant your bulbs. If you can, use a soil thermometer to monitor this. I found that planting too early in cold soil can lead to rot, while planting too late can hinder root development.
Regional Differences in Planting Times
Your planting schedule may vary significantly depending on where you live. For example, northern regions may have a shorter planting window due to early frosts, while southern regions might allow for a longer growing season. I remember visiting a friend in a much warmer climate who planted his bulbs a month earlier than I did in my cooler area. It was a great lesson in how localized gardening can be!
In general, gardeners in the northern U.S. should aim for early fall planting, while those in the south might get away with planting right up until early winter. It’s always a good idea to check your local gardening resources for the best planting windows.
Preparing for Planting
Choosing the Right Location
Choosing the right location for your iris bulbs is one of the most critical steps in the planting process. I’ve learned from experience that these beautiful flowers thrive best in a spot that offers plenty of sunlight. Ideally, aim for an area that gets at least six hours of direct sunlight each day. I remember my first attempt at planting irises; I chose a partially shaded area, thinking they might do well there. Unfortunately, the blooms were sparse and didn’t have that vibrant color I was hoping for. Since then, I’ve made it a point to find sunny spots for all my irises.
Additionally, good drainage is essential for iris bulbs. They don’t like “wet feet,” which can lead to rot. If your chosen area tends to hold water or gets soggy after rain, consider creating raised beds or mounding the soil to improve drainage. I’ve found that irises planted in well-draining soil not only grow better but also bloom more profusely. A little elevation can make a world of difference!
Soil Preparation and Amendments
Once I’ve selected the perfect spot, I focus on soil preparation. Healthy soil is vital for strong iris growth. I always start by testing the soil pH, aiming for a slightly acidic to neutral range (around 6.0 to 7.0). I use a simple soil test kit, which is inexpensive and gives me peace of mind knowing I’m on the right track.
After testing, I make necessary amendments. If the soil is too acidic, adding lime can help balance it out. Conversely, if it’s too alkaline, I might add some sulfur. Also, I’ve found that incorporating organic matter, like compost or well-rotted manure, can greatly enhance soil fertility and drainage. Mixing in a few inches of compost not only improves texture but also provides nutrients that help my irises thrive.
Another aspect I consider is the soil’s texture. Iris bulbs prefer loamy or sandy soil that drains well. If your soil is heavy clay, I recommend amending it with sand and organic matter to create a better environment for the roots. This step might take some extra effort, but I promise it pays off with healthier, more resilient plants.
Tools and Supplies Needed
Before I start planting, I make sure I have all the necessary tools and supplies on hand. Here’s a little checklist of what I find helpful:
- Garden Spade: Essential for digging holes and turning over soil.
- Soil Test Kit: To check pH and nutrient levels.
- Compost or Organic Matter: To enrich the soil.
- Watering Can or Hose: For watering after planting.
- Mulch: To help retain moisture and suppress weeds.
- Gardening Gloves: For protecting my hands while working in the soil.
I’ve also learned that having a garden kneeler or pad can save my knees during planting. The last thing I want is to be sore before I even get to enjoy my beautiful irises! It feels great to have everything prepared and organized before diving into the planting process.
How to Plant Iris Bulbs
Step-by-Step Planting Instructions
Now that I’m all set up, it’s time to get those bulbs in the ground! Here’s how I usually do it:
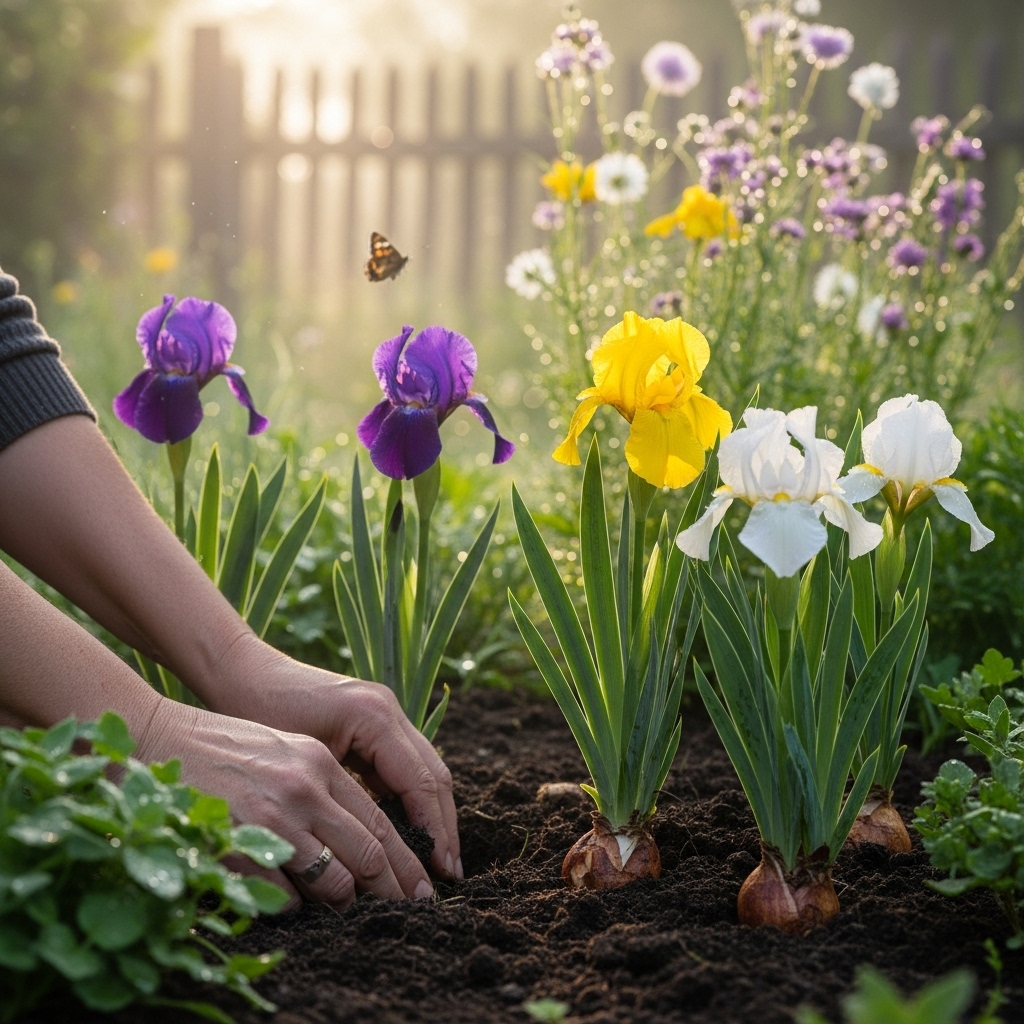
- Dig the Holes: I dig holes for each iris bulb, typically about 4-6 inches deep. I like to space them around 12-18 inches apart to give them room to grow.
- Place the Bulbs: I position each bulb in the hole with the pointed end facing up. This simple detail is something I almost overlooked the first time!
- Fill with Soil: After placing the bulbs, I gently fill the hole back with soil, making sure not to compress it too tightly. I want to leave some air pockets for root growth.
- Water Thoroughly: Once all the bulbs are planted, I give the area a good drink of water. This helps settle the soil and ensures the bulbs are hydrated.
Following these steps makes planting feel more organized and less daunting. I remember feeling a sense of accomplishment after successfully planting my first batch of irises, and I can’t wait for the blooms to emerge!
Spacing and Depth Recommendations
As I mentioned earlier, spacing is key. For bearded irises, I usually stick to the recommended 12-18 inches apart. This spacing allows for proper airflow and prevents overcrowding, which can lead to disease. For dwarf varieties, I often space them a little closer, around 8-12 inches apart, since they don’t take up as much space. It’s always a good idea to refer to the specific needs of the variety you’re planting.
Regarding depth, I’ve found that planting too deep can hinder growth. The general rule is to plant bulbs about twice their height. For most iris bulbs, that means 4-6 inches deep, as I mentioned before. This depth creates a solid foundation for the roots while allowing the leaves to emerge easily.
Watering Techniques Post-Planting
After planting, I like to water the bulbs well. However, I’ve learned that overwatering can be just as harmful as underwatering. In the weeks following planting, I check the moisture level of the soil. If it seems dry a couple of inches down, I give them a drink. I usually aim for consistent moisture, especially during their first growing season.
During the rainy season, I watch for any signs of water pooling around the bulbs, which can lead to rot. If I notice that happening, I might adjust my watering schedule or consider some drainage improvements in the area.
Following this planting guide has helped me cultivate a beautiful iris garden over the years, and I hope it does the same for you!
Caring for Iris After Planting
Watering Guidelines
Once the iris bulbs are safely in the ground, I find that watering is crucial for their early development. In the first few weeks after planting, I make it a point to keep the soil consistently moist but not soggy. I usually water deeply once a week unless there’s rainfall. It’s important to avoid shallow watering, as this encourages roots to stay near the surface rather than developing a strong foundation. I remember when I first planted my irises, I was a bit too cautious with watering and ended up with some bulbs not establishing well. Since then, I’ve learned to be more attentive during those early days.
As the plants begin to grow, I adjust my watering routine. Iris plants generally prefer slightly drier conditions once they are established, so I scale back on watering during the summer months. I check the soil moisture by sticking my finger a couple of inches into the soil; if it feels dry, it’s time for a drink. I’ve noticed that this method really helps me gauge their needs better.
Fertilizing Iris for Best Blooms
Fertilizing is another important aspect of caring for irises that I’ve come to appreciate. I usually apply a balanced, slow-release fertilizer in early spring as the new growth emerges. I’ve found that a formula with a higher phosphorus content encourages blooming, so I often look for fertilizers specifically designed for flowering plants. Following the package instructions is key, as over-fertilizing can lead to lush foliage at the expense of blooms.
In addition to the spring application, I sometimes give my irises a light feeding after the blooms have faded. This helps support the plant as it prepares for the next growing season. I remember the first time I neglected to fertilize after blooming; the next season’s flowers were sparse, and I learned that lesson the hard way. Now, I make it a point to keep my irises well-fed!
Mulching and Weed Control
Mulching is one of my favorite practices when it comes to caring for irises. After planting, I typically lay down a layer of mulch around the base of the plants. This not only helps retain moisture in the soil but also suppresses weeds. I find that keeping weeds at bay is essential, as they compete with my irises for nutrients and water. I usually opt for organic mulch, like shredded bark or straw, which breaks down over time and enriches the soil.
During the growing season, I keep an eye out for any pesky weeds that might pop up. I’ve learned that it’s best to remove them by hand to avoid damaging the delicate roots of the irises. I remember one time when I used a hoe to clear weeds around my irises, and I accidentally disturbed the roots of a few bulbs. That was a painful lesson! Now, I’m much gentler in my approach and take my time to ensure the health of my plants.
As the weather changes and temperatures drop in the fall, I also apply a fresh layer of mulch to protect the bulbs from freezing temperatures. This extra layer helps insulate the soil and ensures that the bulbs are cozy during the winter months. I love knowing that my irises will be ready to burst into bloom come spring! Read Interesting article: Iris Flower Meaning And Symbolism – Know Everything
Common Issues and Troubleshooting
Pests and Diseases Affecting Iris
Like any plant, irises can face a few challenges when it comes to pests and diseases. I’ve encountered aphids and spider mites on my irises before, and I found that they can really sap the energy from the plants. To manage these pests, I usually start with a strong blast of water to knock them off the leaves. If the problem persists, I might use a natural insecticidal soap that’s safe for the plants but tough on the pests.
Another issue I’ve faced is root rot, particularly in areas where drainage isn’t optimal. I’ve learned to recognize the signs, like yellowing leaves or stunted growth. In those cases, I take a look at the soil and consider whether I need to improve drainage, perhaps by amending the soil or relocating the plants. Prevention is key, and I always do my best to ensure my irises have plenty of airflow and drainage.
Signs of Stress in Iris Plants
Recognizing when my irises are stressed has been an important part of my gardening journey. Some common signs include wilting, yellowing leaves, or stunted growth. I remember a time when I noticed my irises weren’t thriving, and after some investigation, I found that they were getting too much shade. Once I relocated them to a sunnier spot, they bounced back beautifully!
Another sign to watch for is the presence of brown tips on the leaves, which can indicate a lack of water or high temperatures. I always make adjustments based on what I observe. Keeping an eye on my plants has helped me intervene early, and I feel so much satisfaction when I can help my garden thrive.
When to Seek Professional Help
Sometimes, despite our best efforts, we might encounter issues that require a bit more expertise. If I notice persistent problems with pests or diseases that I can’t manage on my own, I don’t hesitate to seek help from a local gardening expert or extension service. I’ve found that talking to someone with experience can provide new insights and solutions I might not have considered.
Additionally, if I see my irises struggling to bloom after a few seasons, I might reach out for advice. There could be underlying issues that need addressing, and getting a second opinion can be really beneficial. I’ve learned that it’s okay to ask for help, and there’s a whole community of gardeners who are eager to share their knowledge!
Frequently Asked Questions
When is the best time to plant iris bulbs?
The best time to plant iris bulbs for optimal blooms is in the fall, typically between late August and early October, depending on your climate.
What are the different types of iris bulbs?
The most common types of iris bulbs are Bearded Iris, Beardless Iris (which includes Louisiana, Siberian, and Japanese irises), and Dwarf Iris.
What characteristics should I look for in healthy iris bulbs?
Healthy iris bulbs should be firm to the touch, vibrant in color, and have a robust root system. Avoid bulbs with soft spots or mold.
Can I plant beardless iris varieties in the spring?
Yes, beardless varieties such as Japanese and Siberian irises can be planted in the spring, but fall planting generally leads to healthier plants and better blooms.
What factors influence the planting time for iris bulbs?
Factors influencing planting time include climate, soil temperature, and local weather patterns, such as late summer heatwaves or early frosts.
How deep should I plant iris bulbs?
Iris bulbs should generally be planted about 4-6 inches deep, which is about twice their height, to provide a solid foundation for root growth.
What tools and supplies do I need for planting iris bulbs?
Essential tools include a garden spade, soil test kit, compost or organic matter, watering can or hose, mulch, and gardening gloves.
How should I water iris bulbs after planting?
After planting, water the bulbs thoroughly and keep the soil consistently moist but not soggy. Check moisture levels regularly, especially during the first growing season.
What is the importance of fertilizing iris plants?
Fertilizing is important for promoting blooms and supporting growth. A balanced, slow-release fertilizer with higher phosphorus content is recommended in early spring and possibly again after blooming.
What are some common pests and diseases that affect iris plants?
Common pests include aphids and spider mites, while root rot can occur in areas with poor drainage. Managing these issues involves improving drainage and using natural insecticidal soaps as needed.
Read Interesting article: Stargazer Lily Flowers: Unveiling the Captivating Beauty of Nature