
Potato plants are typically ready to harvest 70 to 120 days after planting, depending on the variety. Knowing when to harvest can make a big difference in the quality and taste of your potatoes. Read Interesting article: When Do You Plant Potatoes for Best Results?
As a passionate gardener, I’ve found that observing the plants closely helps determine the perfect time to dig up those delicious tubers.
Understanding Potato Growth Stages
Growing potatoes is like nurturing a little treasure beneath the soil. When we plant those seed potatoes, it’s the beginning of a fascinating journey. Whether you’re a beginner or have some gardening experience, understanding the growth stages of potatoes is essential for timing your harvest just right.
Seed Potatoes: The Starting Point
It all starts with seed potatoes, which are small tubers that you plant in the ground. I remember when I first started growing potatoes; I was amazed at how these little guys could produce so much food! Seed potatoes can be bought from garden centers or stores, and ideally, they should be certified disease-free. I learned that cutting larger seed potatoes into chunks with at least one “eye” can also be effective, but you’ll want to let them sit for a day or two to dry before planting. This prevents rot when they go into the soil. Read Interesting article: How to Plant Potatoes From Eyes (Step-by-Step)
When you plant these seed potatoes, the goal is to bury them about 4 inches deep. I’ve found that spacing them about 12 inches apart works well, allowing each plant enough room to grow. The excitement builds as we wait for the first signs of life to emerge.
Germination and Early Growth
After about 2 to 4 weeks, the seed potatoes begin to germinate, and you’ll see green shoots poking through the soil. This stage is really thrilling for me; it feels like magic! The plants grow quickly, sending up lush green foliage. At this point, I like to make sure they get enough water and nutrients. I usually add compost to my soil, which really helps my potato plants thrive.
As the plants continue to grow, they develop a strong root system. It’s essential to keep the soil loose and well-drained. I remember the first time I forgot to hill my potatoes properly and regretted it when I saw them struggling! Hilling, or adding soil around the base of the plants, helps support their growth and encourages more tuber production.
Tuber Development Timeline
The most exciting part is when the tubers start to develop. This usually happens about 6 weeks after planting. I typically dig around a little to check the size of the potatoes at this point, but I try to be gentle so I don’t disturb the growth. As they start forming, I’ve noticed that the size can vary significantly between different potato varieties.
As a rule of thumb, new potatoes will be ready roughly 70 days after planting, while larger, mature potatoes will take about 90 to 120 days. This is where timing becomes crucial. I always keep a calendar to note when I planted them, so I don’t lose track.
Many gardeners, including myself, find it helpful to keep an eye on the days and the weather. Warmer conditions can accelerate growth, while cooler weather can delay it. I’ve learned that it’s not just about the days; it’s about the entire growth environment.
Through my experience, I’ve come to appreciate the patience involved in growing potatoes. It’s a process that rewards you with not just food but also a deeper connection to the earth. As I watch my potato plants grow, I get excited about the upcoming harvest, knowing that each stage is a step towards that delicious end goal.
Signs That Indicate Potatoes Are Ready to Harvest
Now that you have a grasp on the growth stages, let’s dive into the signs that indicate when your potatoes are ready to be harvested. I’ve learned that being observant is key, and there are specific indicators to look for.
Plant Foliage Changes
One of the first signs I look for is the change in foliage. As the potatoes mature, the leaves start to yellow and die back. This is a good time to take note. I remember the first time I saw my potato plants wilt; I thought they were dying! But then I learned that it’s completely normal and usually indicates that the tubers are ready for harvest.
Once the foliage has died down substantially, it’s often a sign that tubers are fully formed. I usually wait a week or so after this happens to allow the skin of the potatoes to toughen up. It’s one of those little tips I wish I’d known earlier!
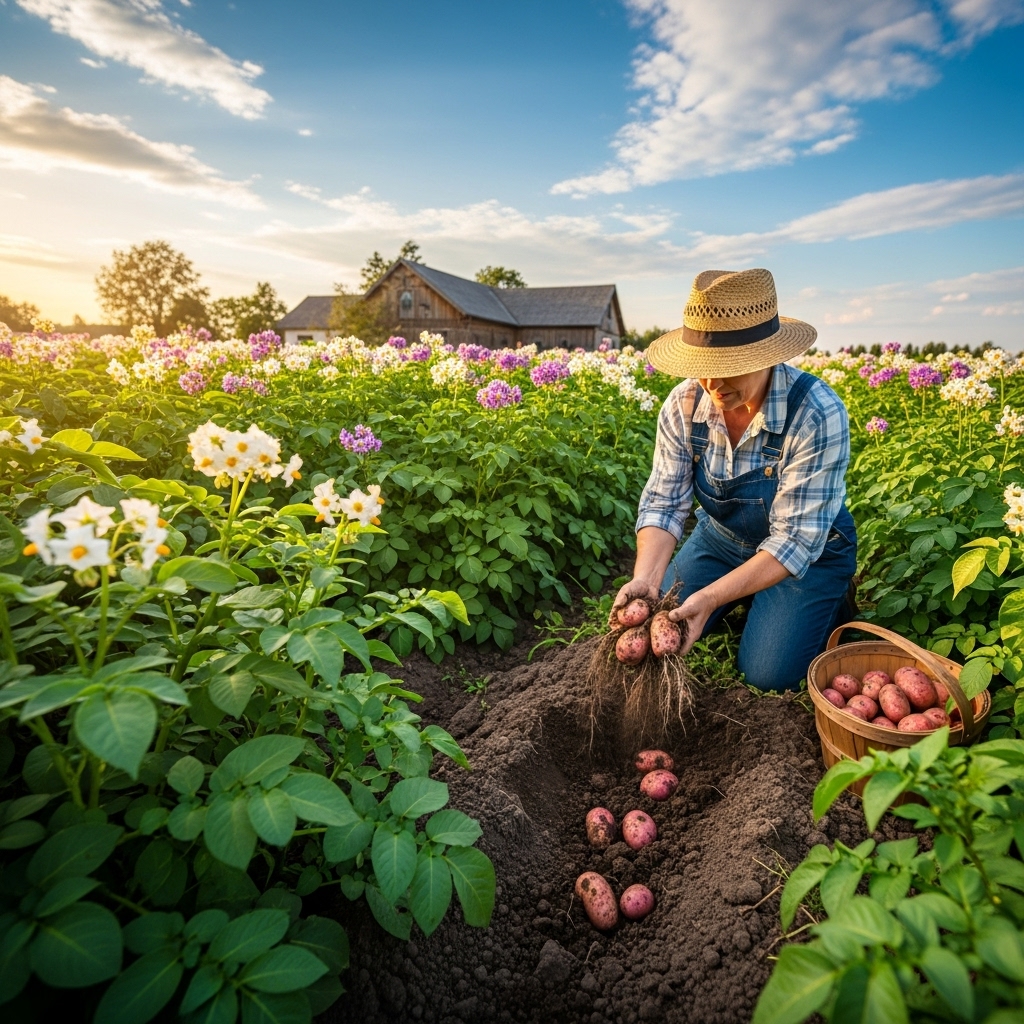
Flowering Stage and Its Significance
The flowering stage also plays a significant role in determining harvest time. Although not all potato plants flower, those that do usually produce beautiful blossoms. I remember being charmed by the delicate purple and white flowers on my plants.
When the flowers bloom, it’s a sign that tubers are developing. While you don’t have to wait for flowers to harvest, their appearance can indicate that your plants are on the right track. If you see flowers, you know that things are happening underground!
Soil Conditions and Tuber Size
Checking the soil conditions is also crucial. After the plants have wilted, I like to dig around gently in the soil to see how big the tubers are. I’ve found that using a garden fork helps avoid damaging the potatoes.
The size of the tubers can provide a good indicator of readiness. When they’re around the size of a golf ball or larger, they’re usually ready for harvesting. I remember the first time I pulled a big potato from the ground; it felt like finding hidden treasure!
The combination of observing the foliage, watching for flowers, and checking the soil all contribute to knowing when to harvest. I believe that listening to the plants and understanding their signals is part of the fun. It’s like being in tune with nature.
With these signs in mind, we can prepare for the exciting moment of digging up those potatoes, knowing that we’ve waited for just the right time to enjoy the fruits of our labor.
Optimal Timing for Harvesting Potatoes
Timing is everything in gardening, and harvesting potatoes is no exception. I’ve learned that knowing when to dig up those tubers can make a huge difference in flavor and texture. It’s not just about counting days; it’s about understanding the signs and considering various factors.
Determining the Right Age of Potatoes
The age of your potatoes is a major factor in when to harvest. I’ve often heard that new potatoes are usually ready around 70 days after planting, while mature potatoes typically take between 90 to 120 days. But honestly, it’s not as straightforward as it seems. I like to think of it as a delicate dance with nature.
I often check the size of my potatoes around the two-month mark to see if they’re the right size for new potatoes. If I want larger potatoes, I hold off a little longer. In my experience, the taste of potatoes harvested when they’re fully matured is just richer and more satisfying. So, I’ve learned to be patient, even when I’m tempted to dig them up early.
Weather Considerations for Harvesting
Weather can play a significant role in determining the right time to harvest. I’ve noticed that in warmer climates, potatoes tend to mature faster. On the other hand, if the weather is cooler, the growth can slow down, which might mean I need to wait a bit longer.
I remember one season when unexpected rain delayed my harvest. The moisture made the soil heavy and challenging to dig in, but I knew that waiting would yield better results. I always keep an eye on the local weather forecast as I approach the harvest time. If there’s a warm spell, I start checking those potatoes more frequently!
It’s also important to consider the soil conditions. If it’s been particularly dry, I might go ahead and harvest a bit earlier to avoid the risk of drought stress on my plants. Learning to read the signs from nature, like checking the soil moisture, can guide me in making the best decision for my harvest.
Early vs. Late Harvesting: What’s the Difference?
Choosing between early and late harvesting can be a bit of a dilemma for many gardeners, myself included. Early potatoes, or “new potatoes,” are harvested before the skins have fully set. They’re smaller, tender, and perfect for eating right away. I love how creamy and flavorful they can be, especially when roasted with a bit of olive oil and herbs.
However, if I choose to wait until later, I get mature potatoes that tend to have thicker skins and a longer shelf life. I’ve found that late-harvested potatoes tend to be more versatile in cooking and can be stored for months, which is a major plus in my book.
Ultimately, it’s about what I want from my garden. If I’m in the mood for fresh, tender potatoes for a summer salad, I’ll go for the early harvest. If I want to stock up for the winter, I’ll wait for those mature tubers. I’ve learned to appreciate both stages and love experimenting with different recipes depending on when I choose to harvest.
Types of Potatoes and Their Harvesting Timelines
Not all potatoes are created equal, and knowing the different types can help me plan my harvest more effectively. Each variety comes with its unique timeline and characteristics, and I’ve found that understanding these nuances enriches my gardening experience.
New Potatoes: Characteristics and Harvest Time
New potatoes are like the stars of the early summer garden. They’re small, tender, and full of flavor. I typically harvest these within 70 days of planting. The skin is delicate, and the flesh is creamy, making them a favorite for boiling or steaming.
I remember the first time I tried new potatoes; I was surprised at how different they tasted compared to mature ones. They’re perfect for lighter dishes, like potato salads or simply tossed with butter and herbs. For me, the excitement of digging up these little gems is a delightful way to kick off the harvest season. Read Interesting article: How to Plant Potatoes in a Bucket (Easy Container Method)
Waxy Potatoes: When to Harvest
Waxy potatoes, like red or fingerling varieties, have a higher moisture content and are great for boiling and roasting. I’ve typically found they take about 90 to 100 days to mature. The key is to watch their foliage closely, as they tend to have a longer growing season.
When harvesting waxy potatoes, I’ve learned to be particularly careful. Their skins can be thin, and they can bruise easily. I like to dig them up gently, ensuring I don’t damage the delicate tubers. The flavor of a perfectly harvested waxy potato is rich and satisfying, making it worth the effort.
Starchy Potatoes: Signs of Readiness
Starchy potatoes, like russets, are the heavy hitters in the potato world. They’re generally harvested after about 90 to 120 days. I’ve found that these potatoes are best for baking or creating fluffy mashed potatoes. The key signs I look for include the foliage dying back and checking the size of the tubers.
One mistake I’ve made in the past is harvesting them too early. The texture can be off if I don’t wait for them to fully mature, and that’s just disappointing. Now, I take my time with starchy potatoes, ensuring they’re fully developed before digging them up. The results are always worth the wait!
How to Harvest Potatoes Properly
Harvesting potatoes can be one of the most rewarding moments in a gardener’s journey. After nurturing those plants for months, it feels incredible to finally see the fruits of our labor. However, it’s important to approach the harvest with care to ensure that we maximize our yield and keep our potatoes in good condition.
Tools Needed for Harvesting
Before we get started, let’s talk about the tools I find essential for harvesting potatoes. I’ve learned that having the right equipment can make this process much smoother. Here’s what I typically use:
- Garden Fork: This has become my go-to tool. A garden fork allows me to gently lift the soil without damaging the tubers.
- Shovel: Sometimes, a shovel is necessary for larger gardens or tougher soil. I tend to use it carefully to avoid cutting through potatoes.
- Gloves: Protecting my hands is always a good idea. I often wear gloves to prevent scrapes and to keep my hands clean.
- Bucket or Container: Once I start harvesting, having a container ready to collect the potatoes makes it easy to transport them.
These tools have made my harvests more efficient and enjoyable. I remember my first time harvesting without gloves; my hands ended up dirty and scratched! Now, I always gear up.
Techniques for Digging Up Potatoes
When it’s time to dig up my potatoes, I take a moment to savor the anticipation. I approach this task with a mix of excitement and care. Here’s the technique I’ve honed over the years:
1. **Start at the Edges:** I usually begin digging around the perimeter of the plant. This way, I can loosen the soil without disturbing the roots or tubers directly. It feels like uncovering a treasure chest!
2. **Use a Garden Fork:** I gently insert the fork into the soil about 8 to 12 inches away from the base of the plant, angling it slightly downwards. With a gentle pull, I lift the soil, creating a space where the potatoes can pop up.
3. **Work in Sections:** I find it useful to work in small sections. After loosening the soil, I can carefully sift through it with my hands to find any hidden potatoes. It’s thrilling to discover them nestled in the earth.
4. **Avoiding Damage:** I always take care not to stab or squeeze the tubers. I’ve made that mistake before, and trust me, it’s heartbreaking to see a beautiful potato ruined. Patience and gentleness are key.
This technique has significantly improved my harvest experience. I often feel like a kid on a treasure hunt, eagerly uncovering each potato and marveling at its size and shape.
Minimizing Damage to the Tubers
One of the most important lessons I’ve learned is how crucial it is to minimize damage to the potatoes during harvesting. The last thing I want is to end up with bruised or cut tubers. Here’s what I do to keep them in prime condition:
– **Be Gentle:** As I mentioned before, I always handle the tubers as gently as possible. I try to lift them by their tops instead of squeezing or crushing them. This is especially important for those delicate new potatoes.
– **Check for Pests or Disease:** While I’m harvesting, I also keep an eye out for any signs of pests or disease. If I notice anything unusual, I handle those potatoes separately to prevent spreading any issues to my healthy ones.
– **Harvest on a Dry Day:** I’ve found that harvesting potatoes on a dry day makes for an easier experience. Wet soil can make digging harder, and it’s also more likely for tubers to get damaged when they’re muddy. Plus, it’s easier to store them when they’re dry!
With these strategies in mind, I feel equipped to harvest my potatoes successfully. Each harvest is not just about gathering food; it’s about honoring the process and enjoying the fruits of our labor.
As I fill my container with freshly dug potatoes, I can’t help but feel a sense of accomplishment. There’s something special about knowing that these little treasures have come from my own garden, nurtured with care and attention. It’s a reminder of the connection we have with the earth and the joy that gardening can bring.
Frequently Asked Questions
How long does it typically take for potato plants to be ready for harvest?
Potato plants are usually ready to harvest between 70 to 120 days after planting, depending on the variety.
What is the starting point for growing potatoes?
The starting point for growing potatoes is planting seed potatoes, which are small tubers. They should ideally be certified disease-free and can be cut into chunks with at least one “eye” before planting.
How deep should seed potatoes be planted?
Seed potatoes should be buried about 4 inches deep in the soil.
What are some signs that indicate potatoes are ready to be harvested?
Signs that indicate potatoes are ready to be harvested include yellowing and dying back of the foliage, the appearance of flowers, and checking the size of the tubers, which should be around the size of a golf ball or larger.
What is the difference between early and late harvesting of potatoes?
Early potatoes, or “new potatoes,” are harvested before the skins have fully set and are smaller and more tender. Late-harvested potatoes are larger with thicker skins and have a longer shelf life, making them more versatile for cooking.
What tools are recommended for harvesting potatoes?
Recommended tools for harvesting potatoes include a garden fork for gently lifting soil, a shovel for larger gardens or tougher soil, gloves for hand protection, and a bucket or container for collecting the potatoes.
How can I minimize damage to potatoes during harvesting?
To minimize damage during harvesting, be gentle when handling tubers, avoid squeezing or stabbing them, check for pests or diseases while harvesting, and harvest on a dry day to prevent mud-related damage.
What is the ideal condition for soil while harvesting potatoes?
The ideal condition for soil while harvesting potatoes is to ensure it is dry, as wet soil can make digging harder and increase the risk of damaging the tubers.
What is the significance of the flowering stage in potato plants?
The flowering stage is significant as it indicates that tubers are developing. While you don’t have to wait for flowers to harvest, their appearance can show that the plants are on the right track.
How does weather affect the timing of potato harvesting?
Weather can significantly affect the timing of potato harvesting. In warmer climates, potatoes tend to mature faster, while cooler weather can slow growth, potentially requiring a longer wait before harvesting.